Capturing New Business
For some businesses, capturing new leads means writing names on a whiteboard, while others use spreadsheets or even scraps of paper. If you truly want to grow your business, you need to have a better system to remember all those details for you.
Daylite gives you an entire tool box to do exactly that. Tracking your leads, organizing all the moving pieces, and streamlining your sales process begins by capturing new business as Opportunities in Daylite.
Whether you use your Mac, email, iPhone or iPad to capture new business, Daylite is right there to help keep you organized. Enter an Opportunity's information on one device, and instantly access it from another. It really is that easy.
Capturing New Business on your Mac
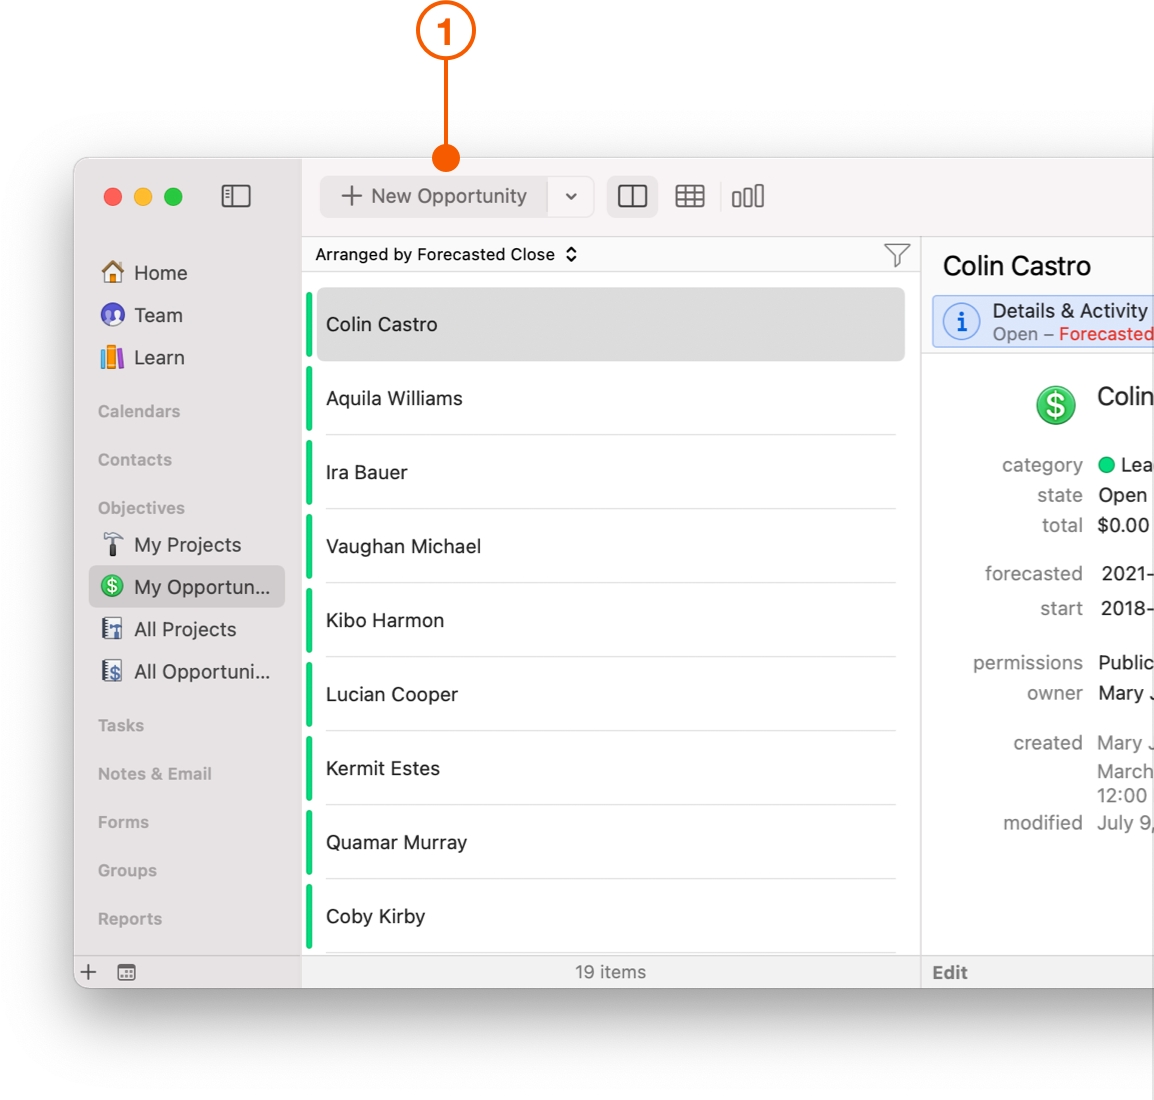
The easiest way to start tracking new business is to create a new Opportunity with the New Item button.
To create a new Opportunity, click All Opportunities or My Opportunities in the Daylite Sidebar, then select + New Opportunity.
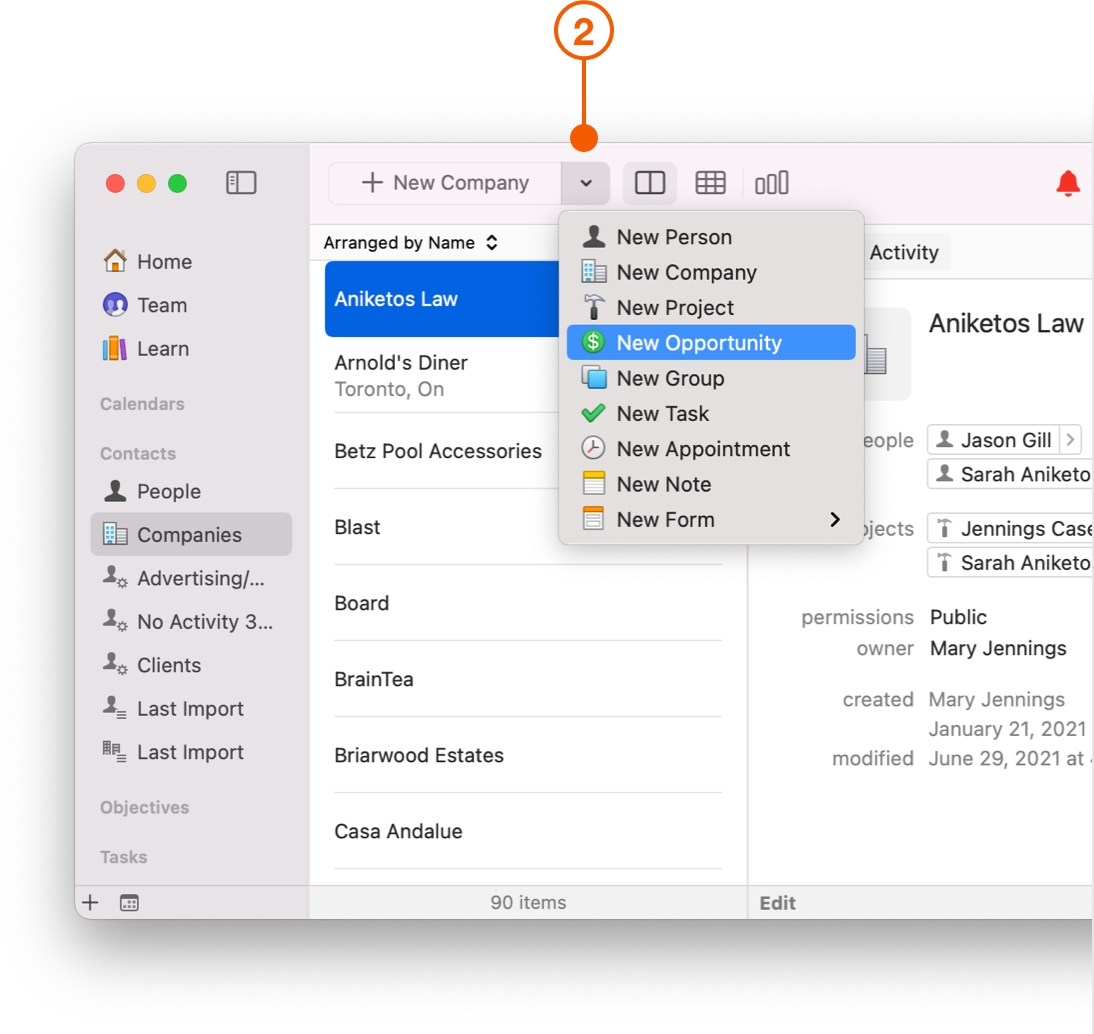
Alternatively, if you're not viewing an Opportunity, you can click the downward facing arrow next to the New Item button and choose New Opportunity. For example, you might have People selected in the Sidebar and want to create a new Opportunity without leaving your spot.
Capturing New Business from an Email
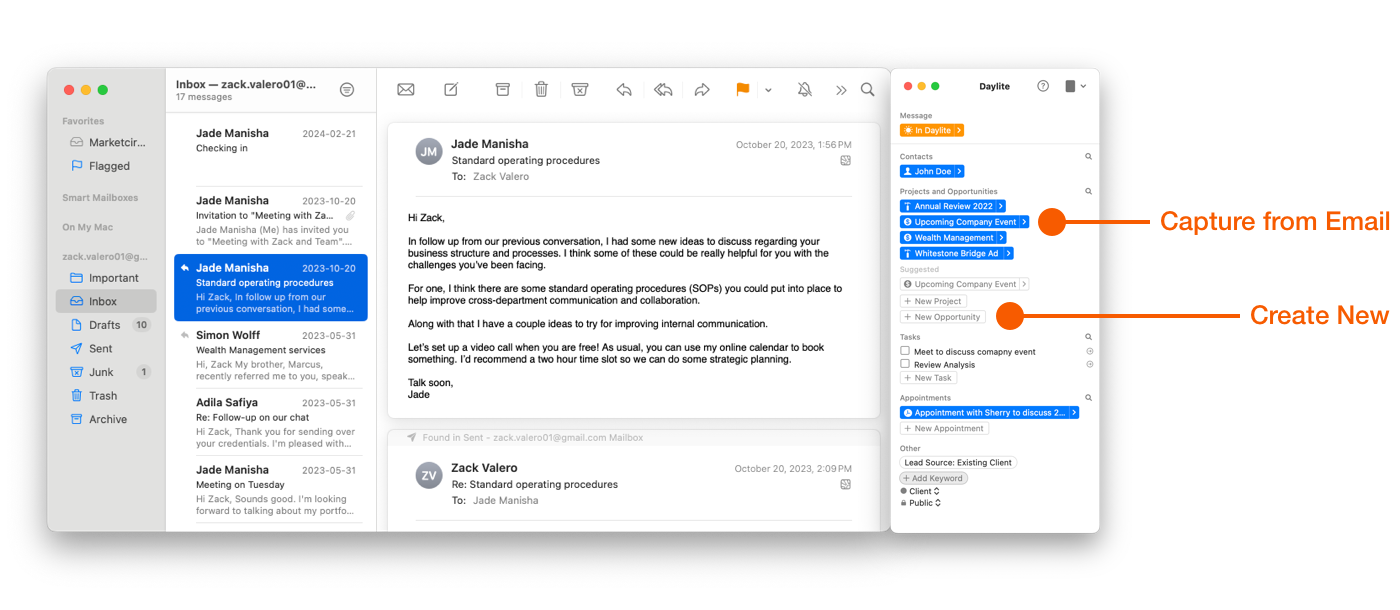
Whether responding to a marketing email, online form, or after handing out your business card, email is one of the most common ways new business starts.
Daylite includes the Daylite Mail Assistant, an extension for Apple Mail. It allows you to capture things like new Opportunities straight from your inbox, while also linking them to the email.
Capturing New Business from an iPhone or iPad
You're not always in front of your Mac and that's where Daylite for the iPhone and iPad comes in. The Opportunities you create while on the go will sync with your other Daylite devices, so you always have the most up to date information.
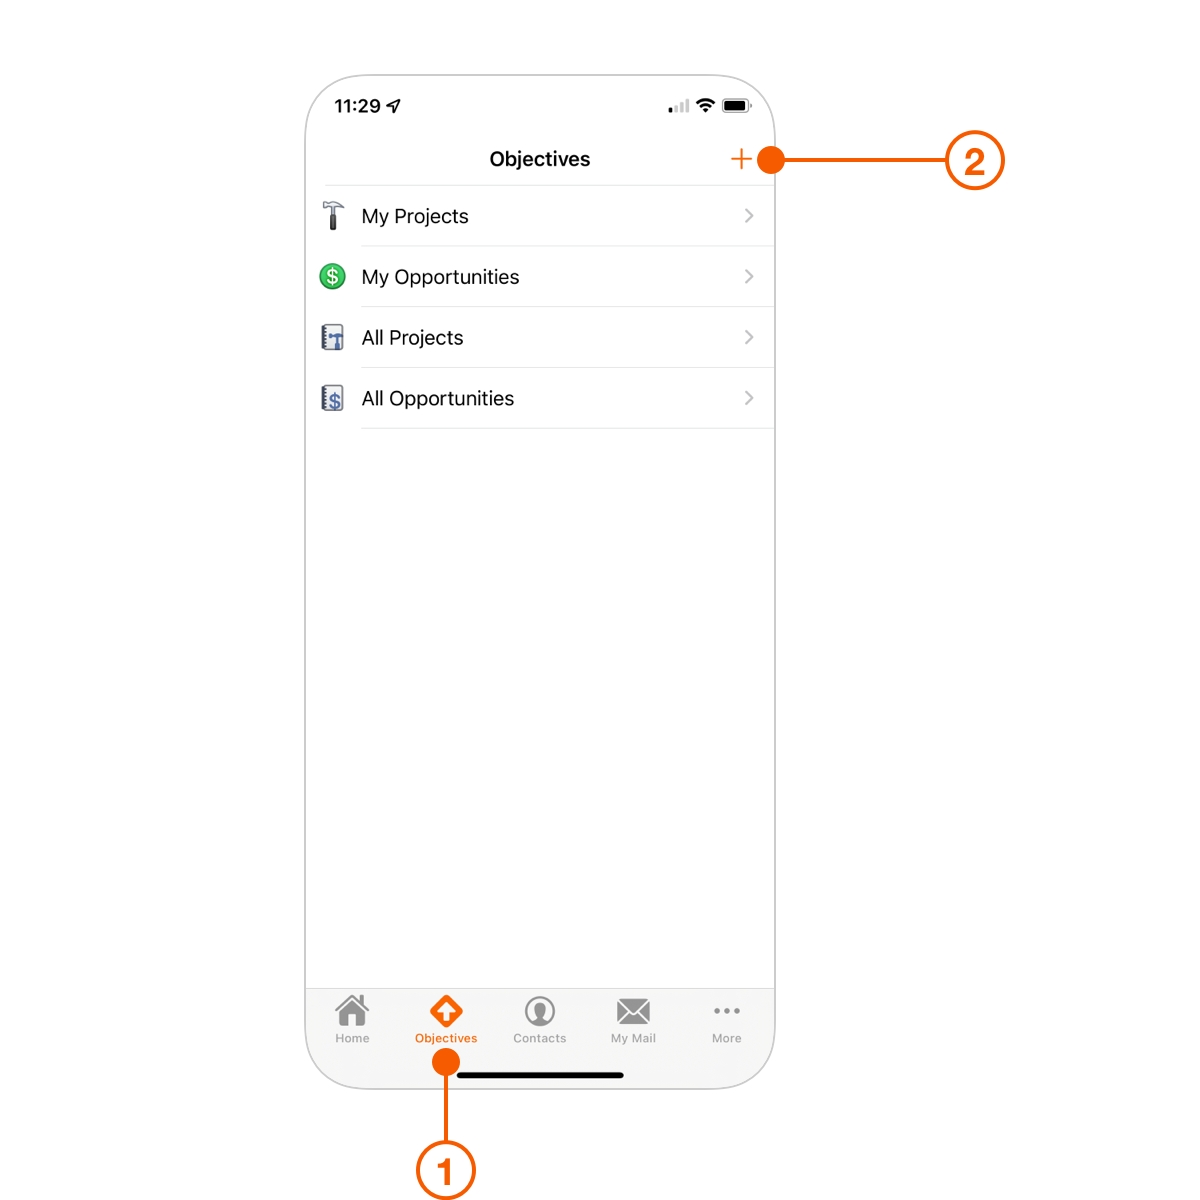
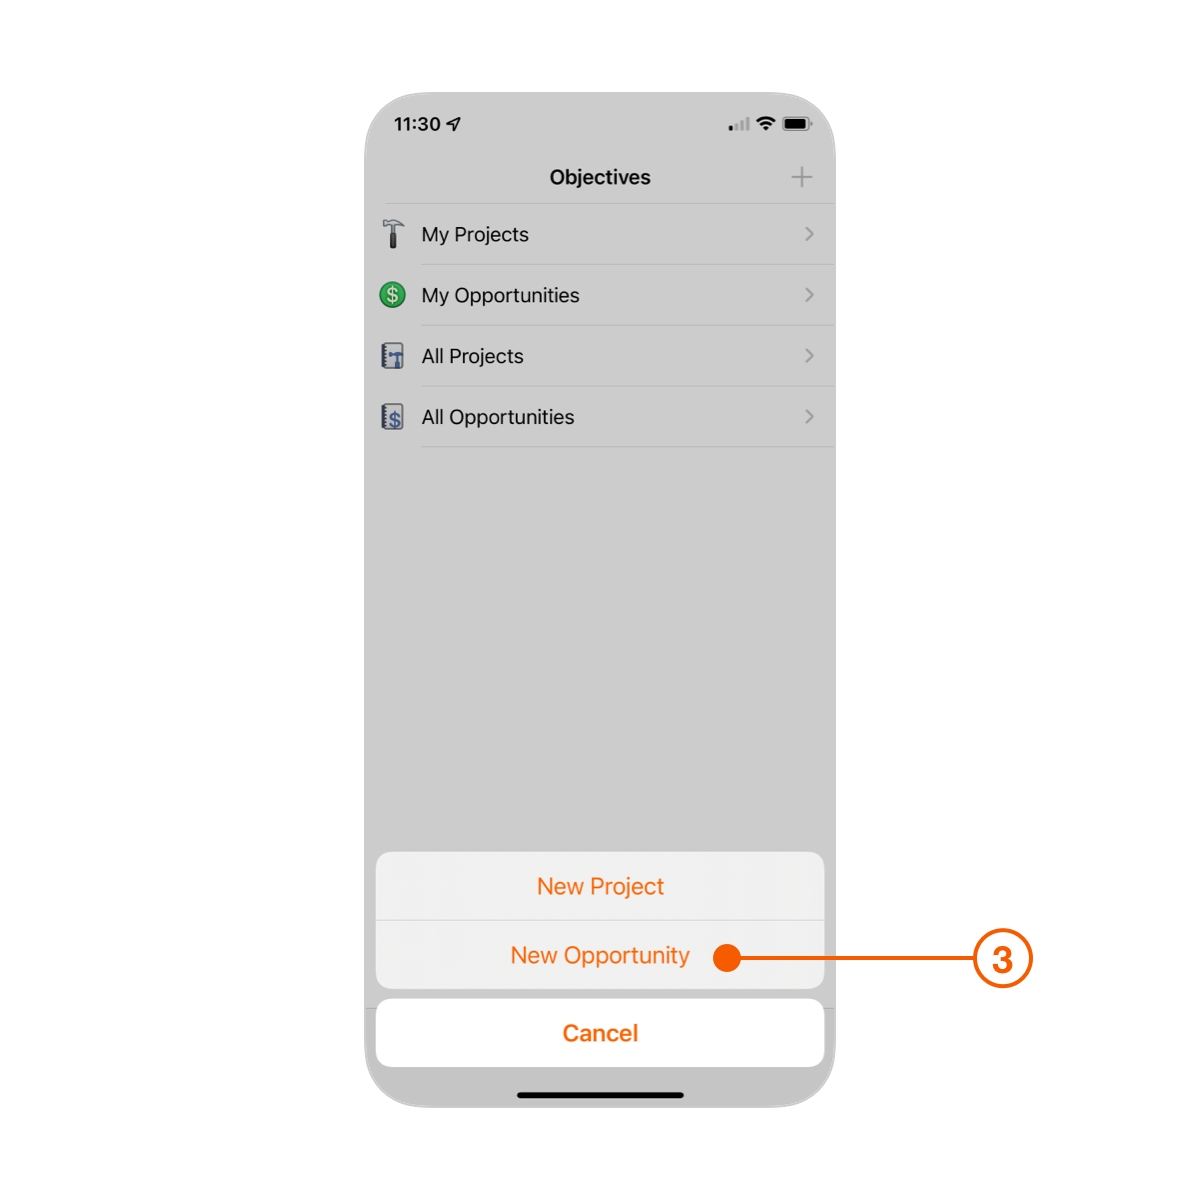
Tap the Objectives tab.
Tap the + button.
Select New Opportunity.
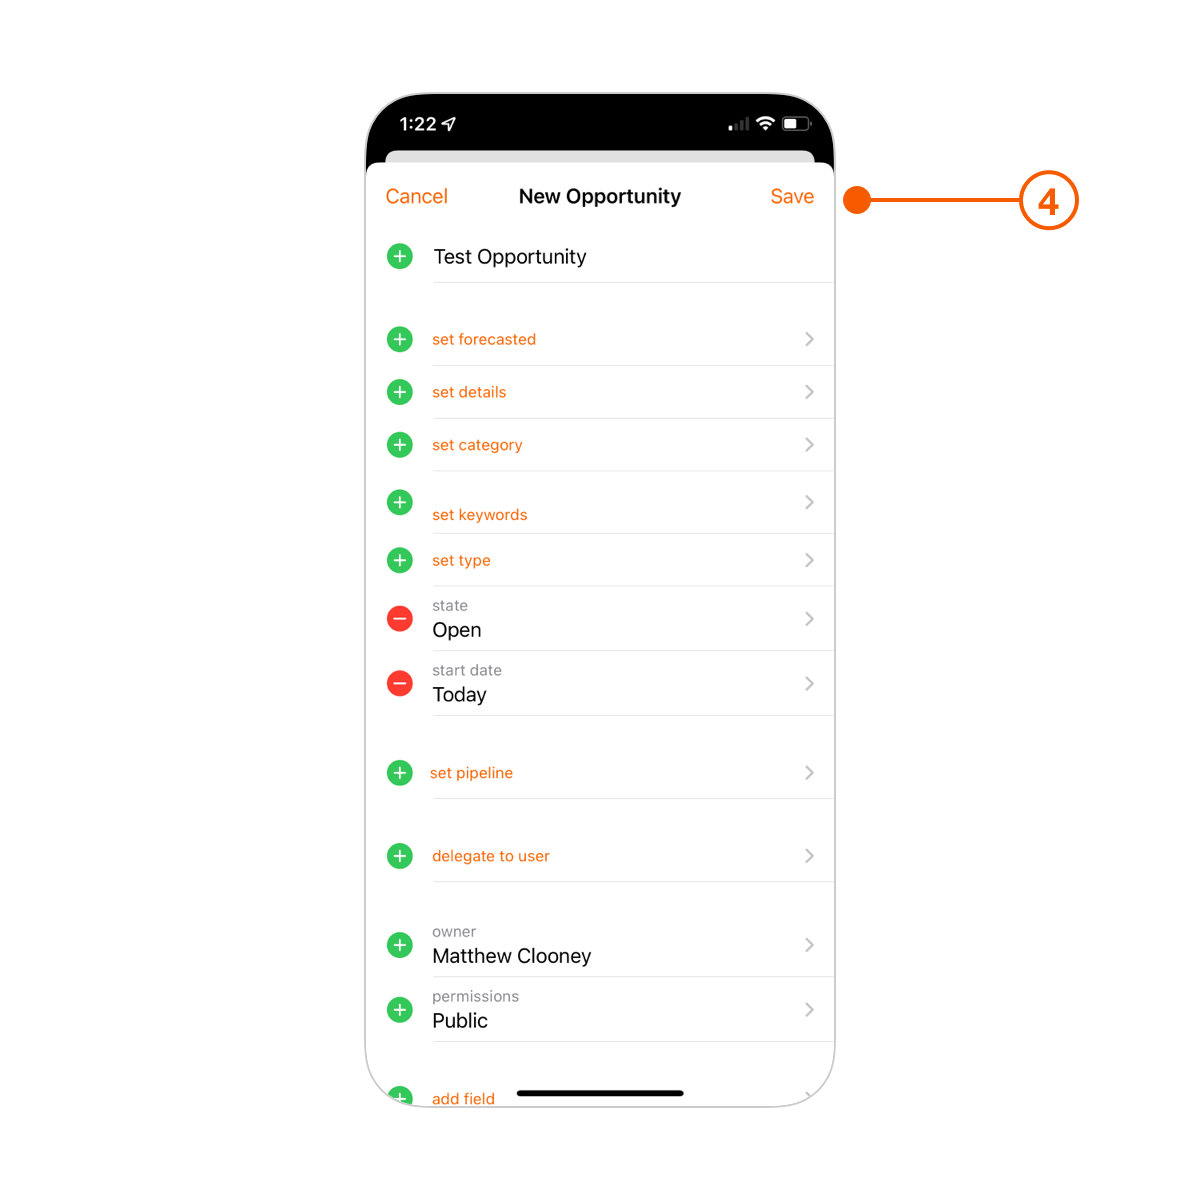
Fill in all the information you have for the Opportunity, then tap Save.
Daylite gives you a lot of Opportunity fields to fill out. Don't worry though, you don't have to use them all. Gather the information you need today and as you learn more, or update your sales process, you may decide to fill in additional fields at a later date.
Fill out the Basics
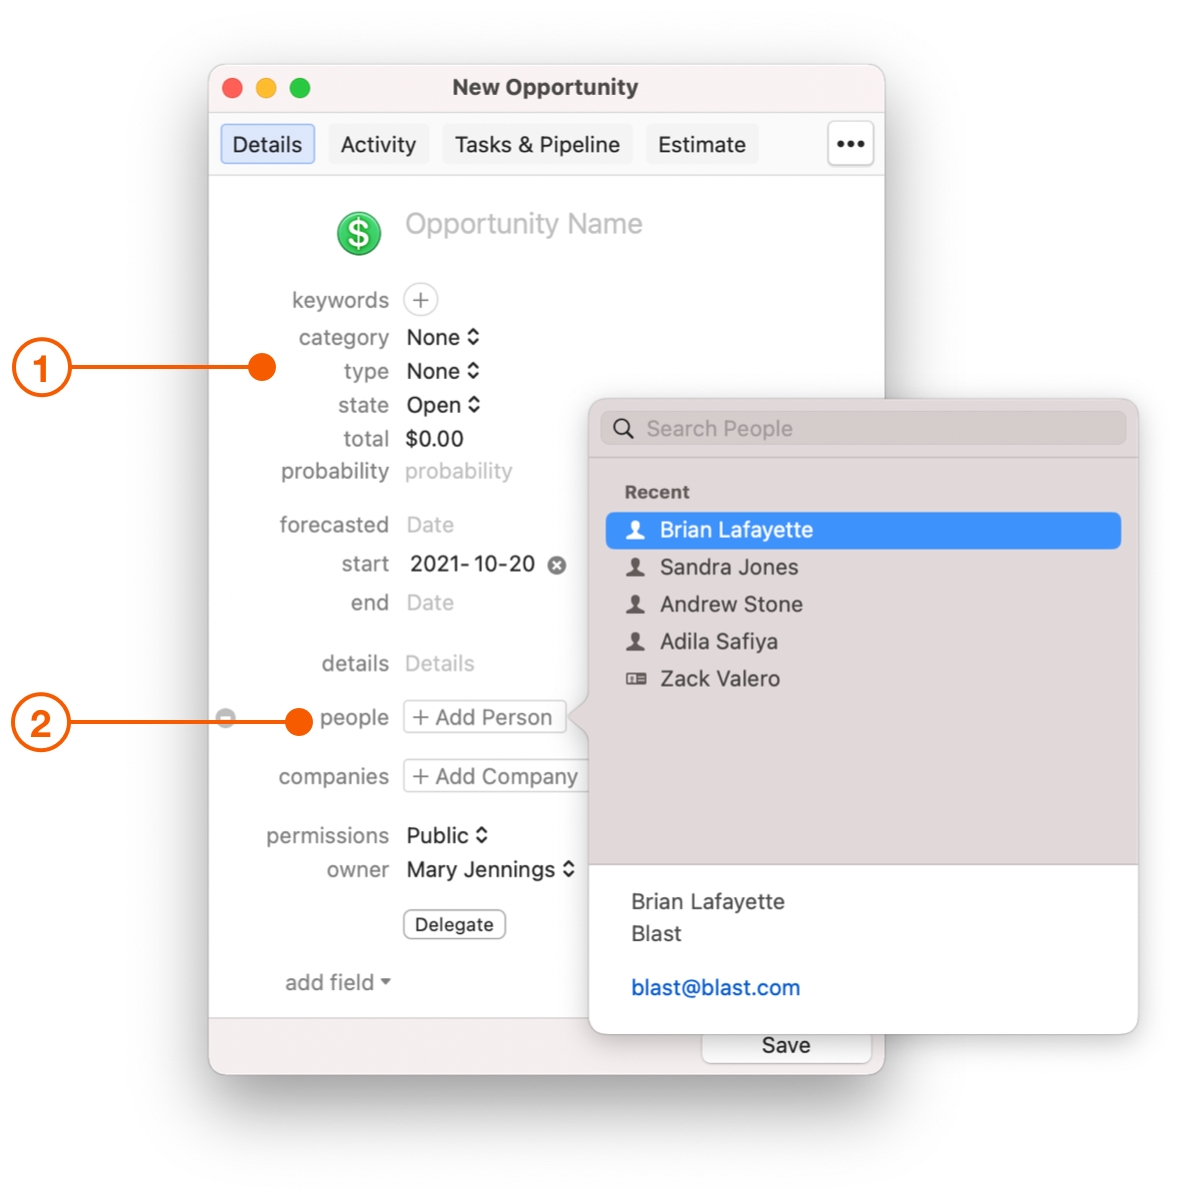
Every Opportunity should have the Name, Start Date, and Details filled in. You may also want to add a Forecast Date as a guide for when you expect a deal to close, as well as create an Estimate to track an Opportunity's total value.
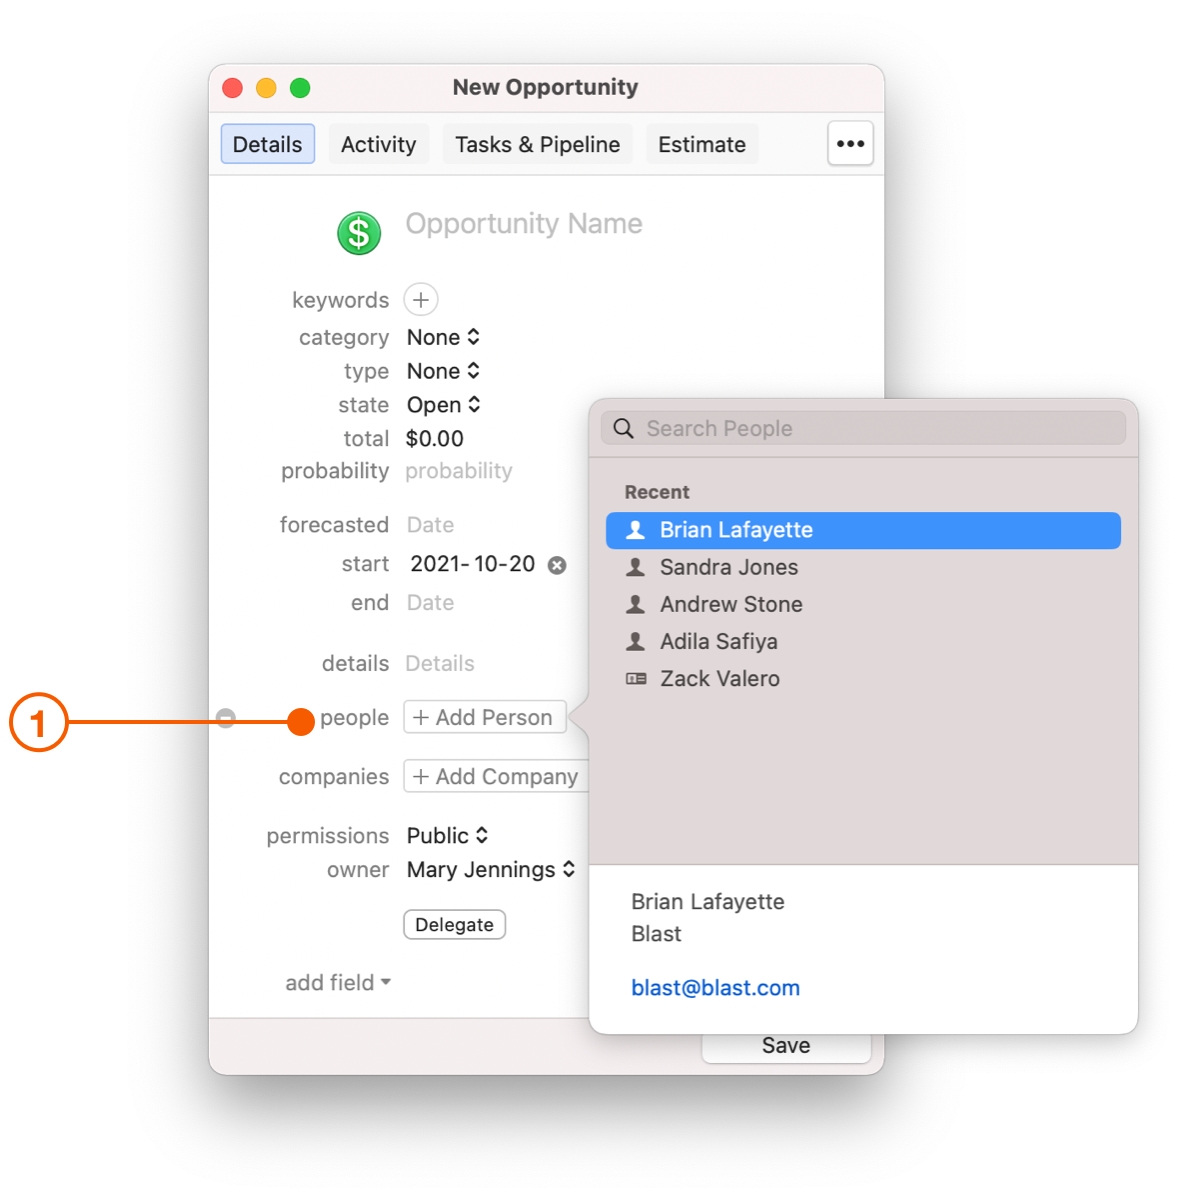
Be sure to link any People or Companies that are relevant to the Opportunity.
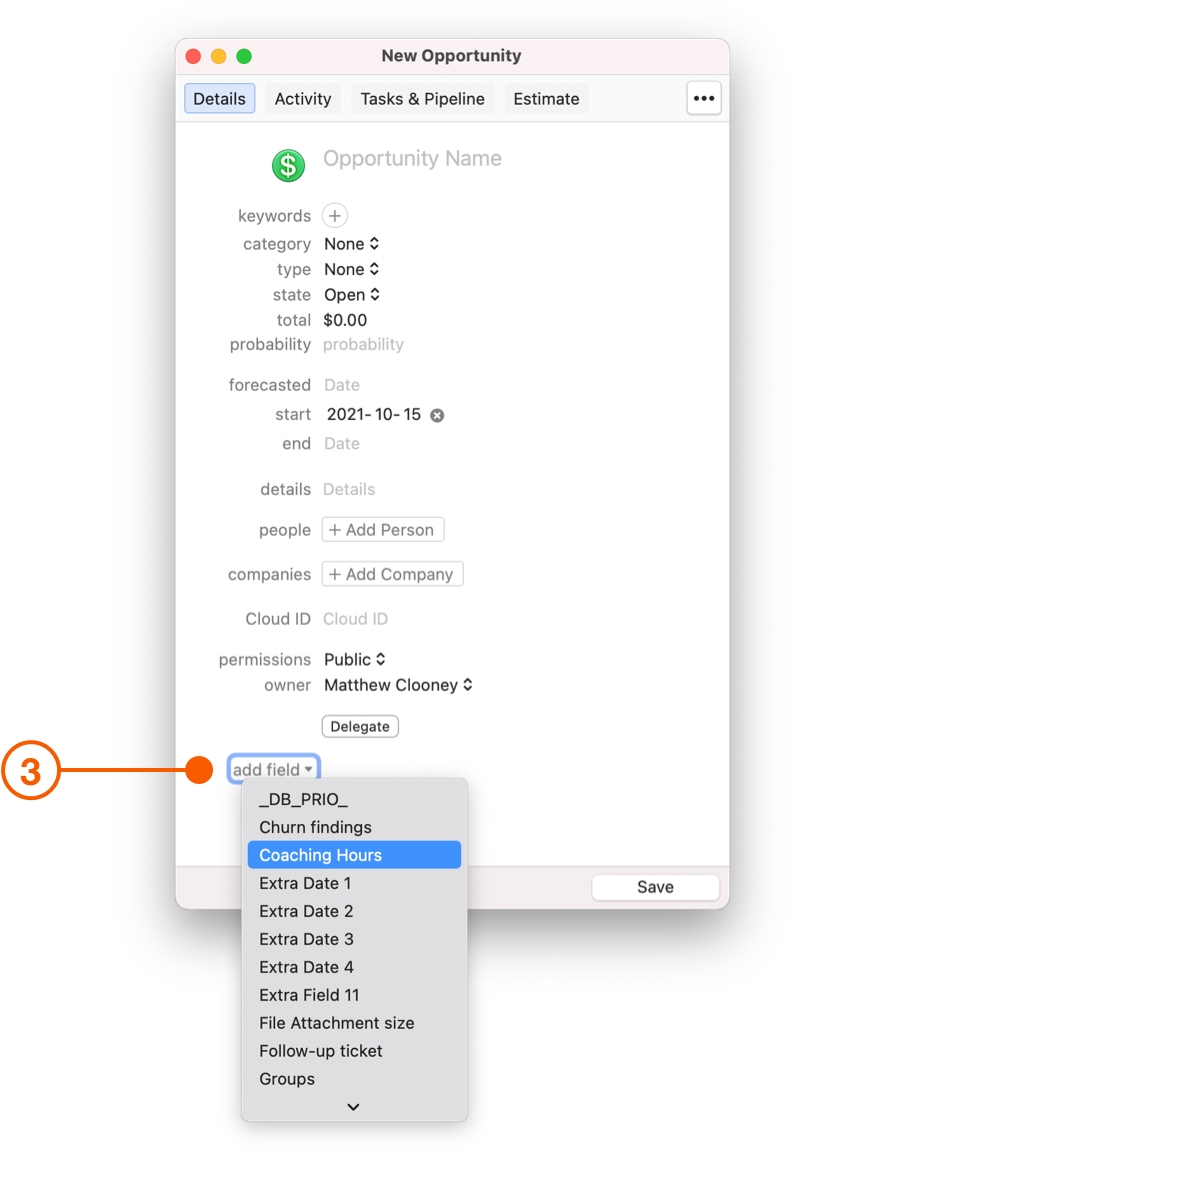
If you need to capture more information, click add field at the bottom of the Opportunity card and add the field you need. For even more fields, check out Custom Fields and Forms.
Pro Tip:
Adding the same field over and over again?
Add it as default!
Choose Daylite > Preferences and select Defaults. Now add the fields in the Opportunities tab.
Custom Fields
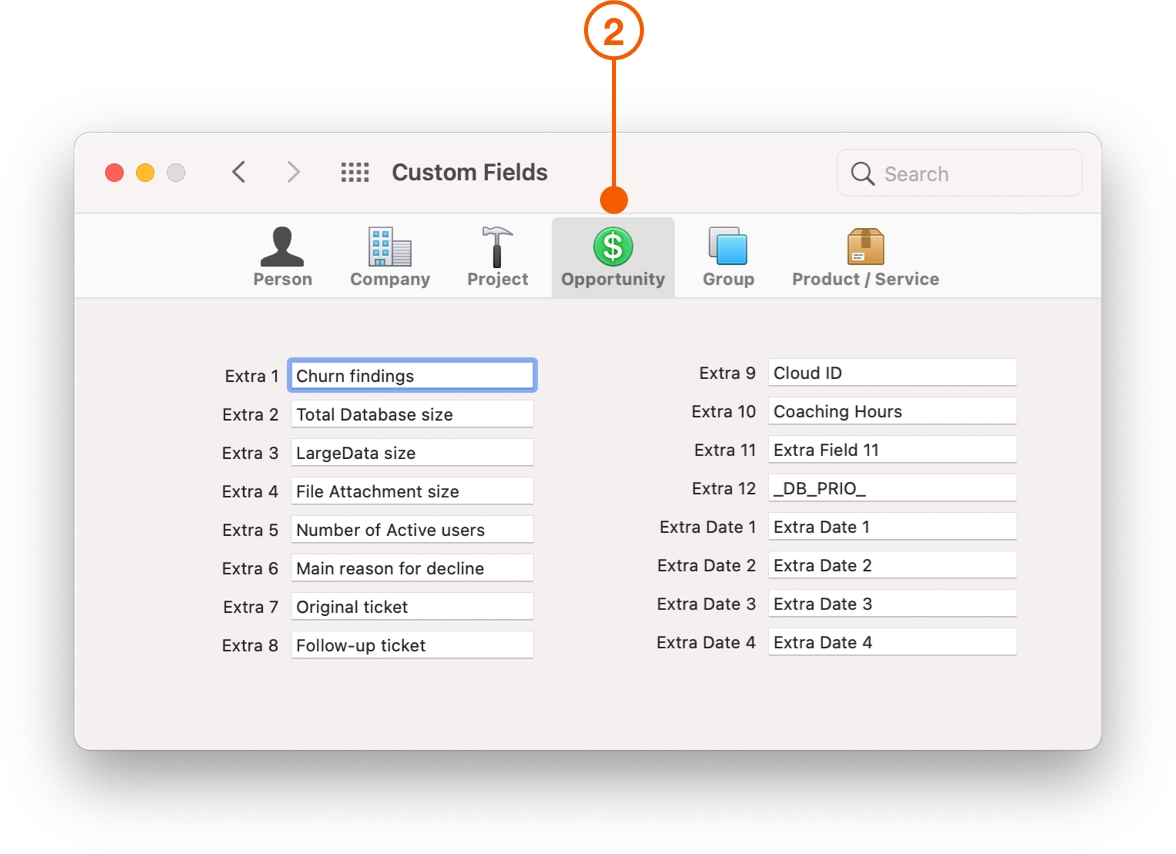
Custom fields give you more flexibility. With 12 extra fields and 4 extra dates for Opportunities, you can choose what information you capture.
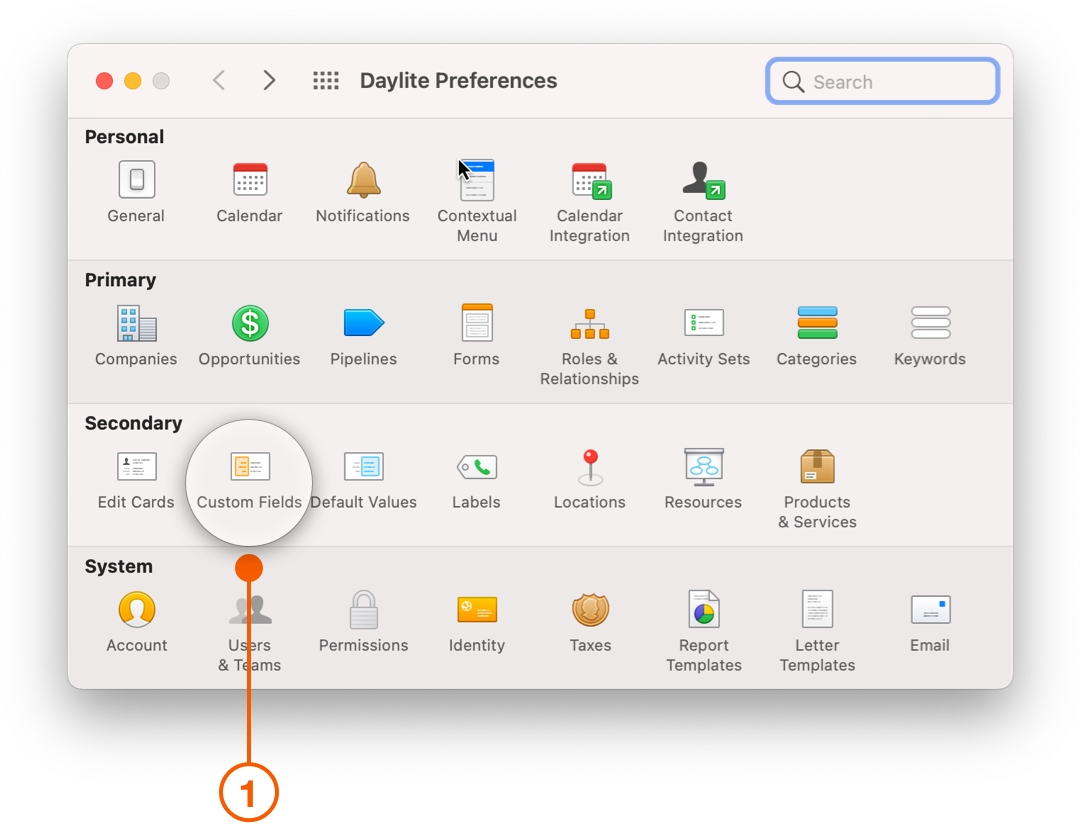
Choose Daylite > Preferences > Custom Fields
Select Opportunity and add the names of any custom fields or custom dates you require.
Opportunities will now have access to these fields from the add field menu.
Using Forms as Custom Fields
When you link a Form to an Opportunity, you can capture more details and have more flexibility with the type of information you use.
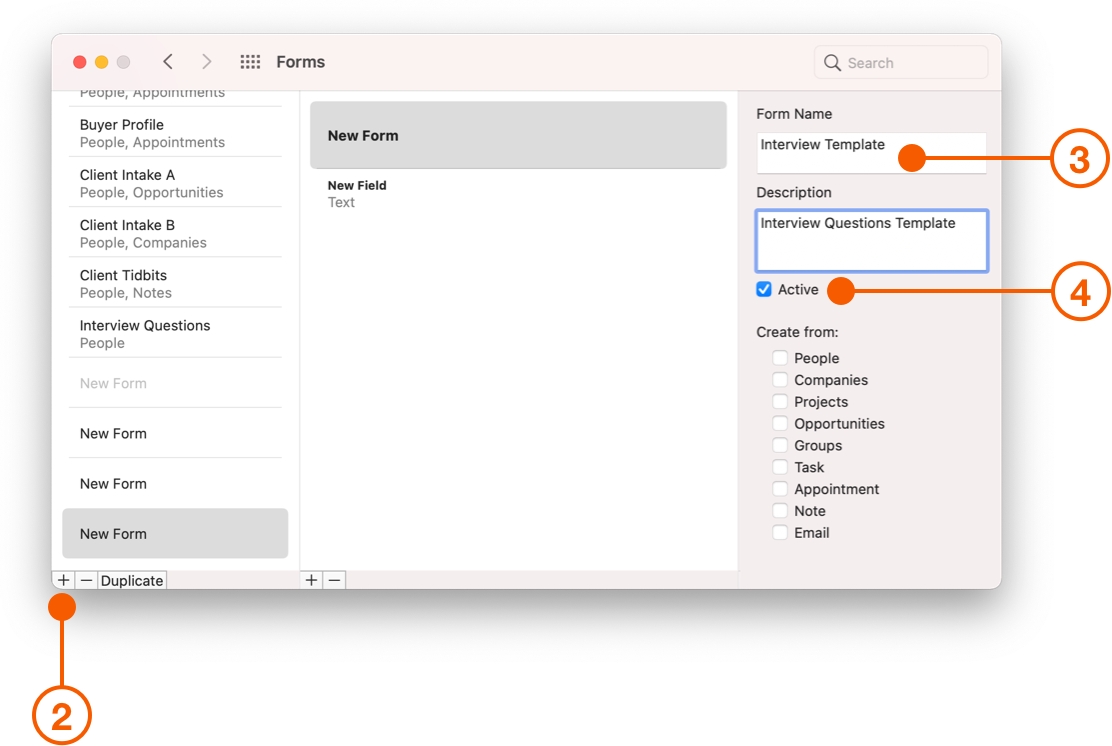
To create a Form, go to Daylite Preferences and select Forms
Click the + sign to create a new Form template.
Give your template a name and description.
Make it Active.
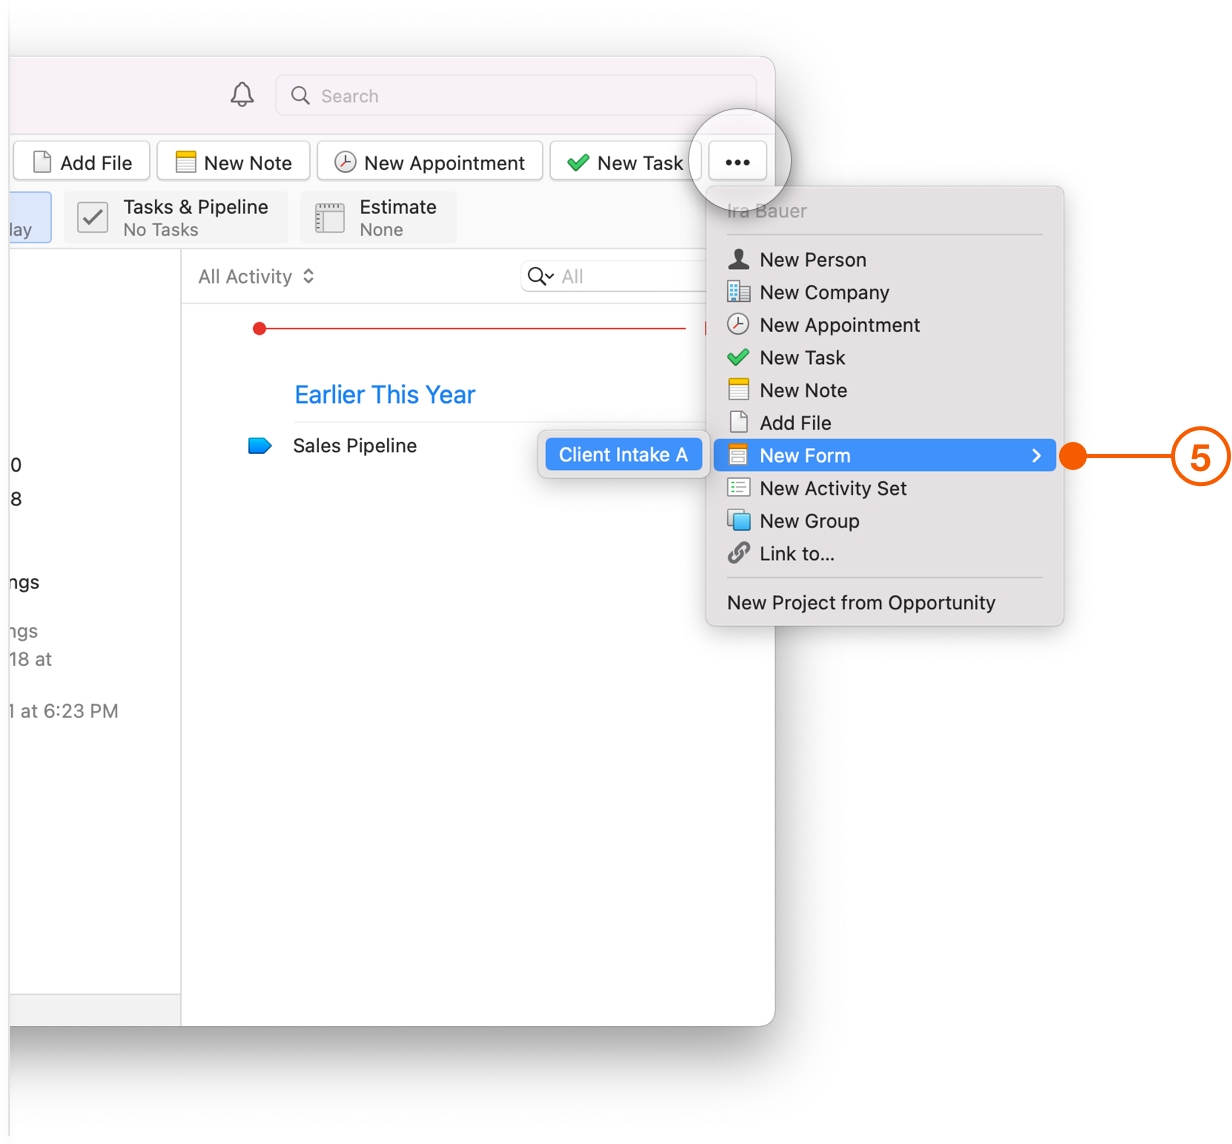
Now you can select the Form you just created from the … button.
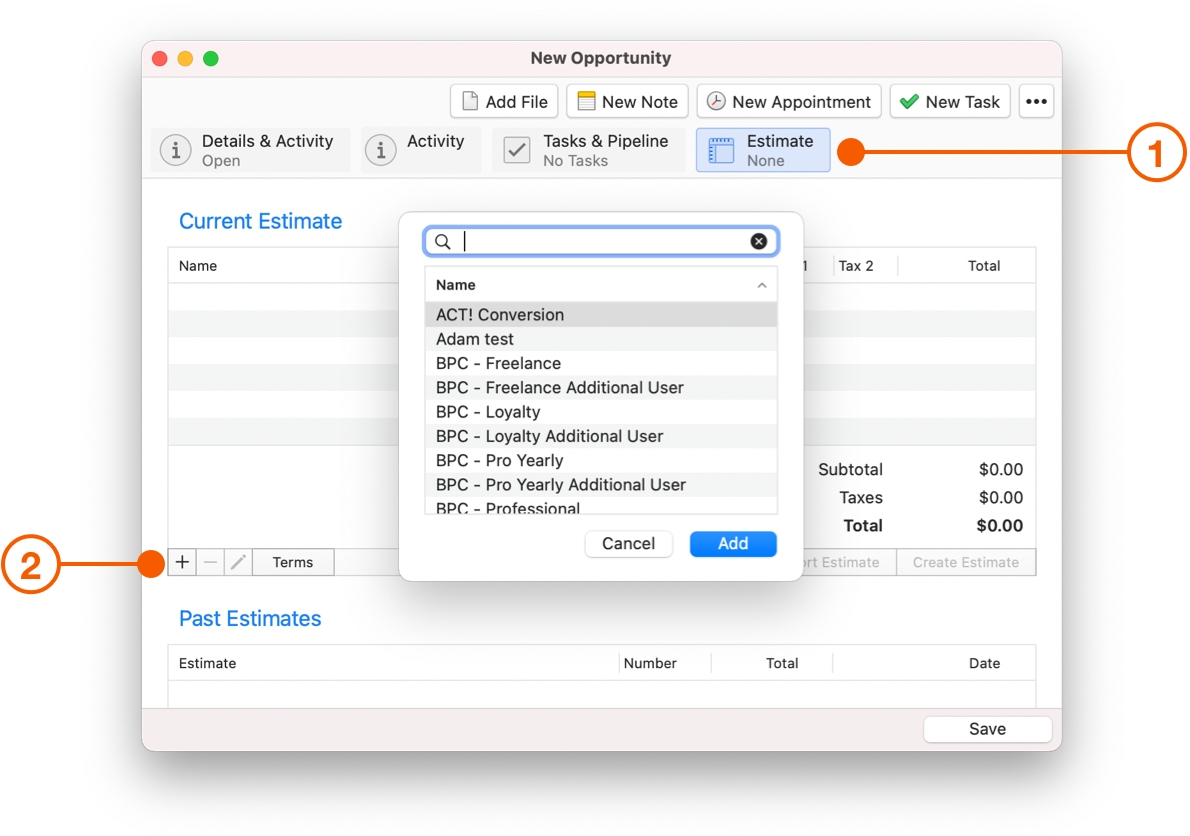
Opportunity Estimates
Estimates are a way to track the total possible business a new Opportunity offers. This can be used for internal tracking but you can also send a simple quote to a lead as a PDF.
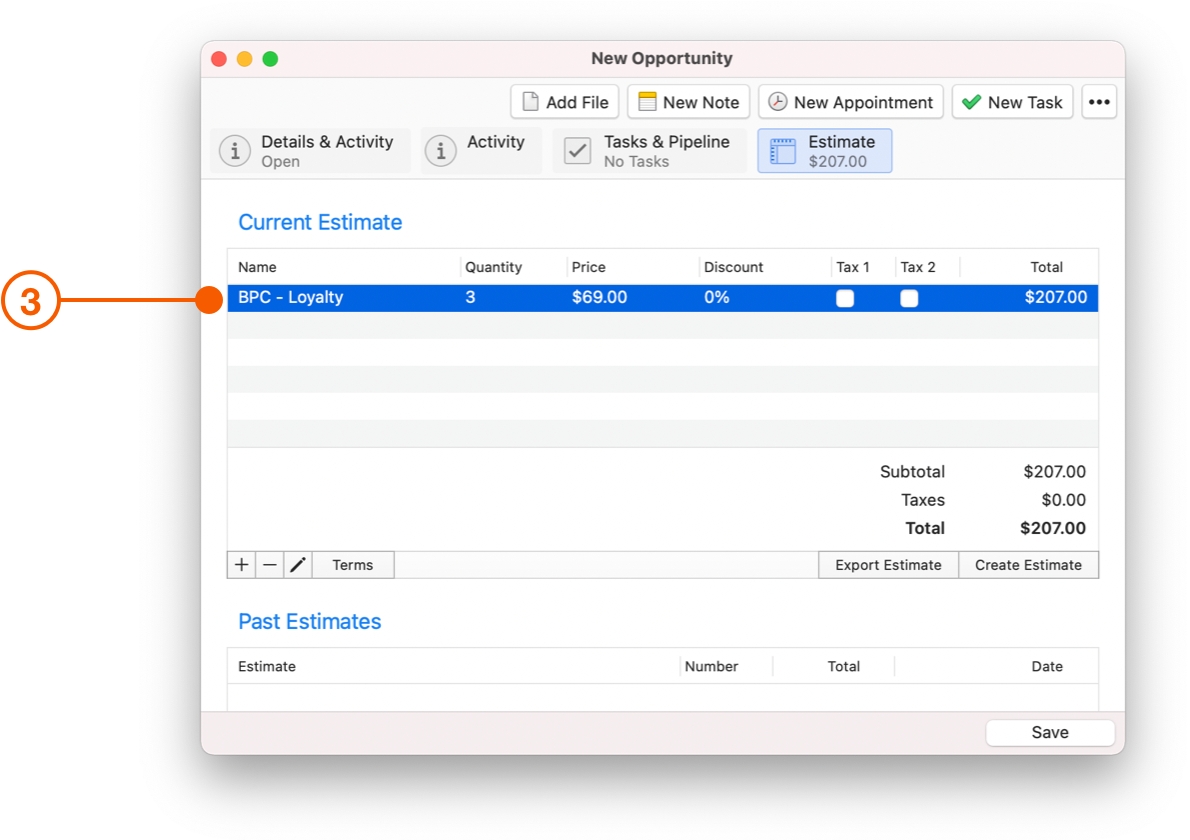
Click the Estimate tab on an Opportunity.
Click the + button to add a custom line item or choose an item from your saved Products and Services.
You can adjust the number of items, price discount, etc.
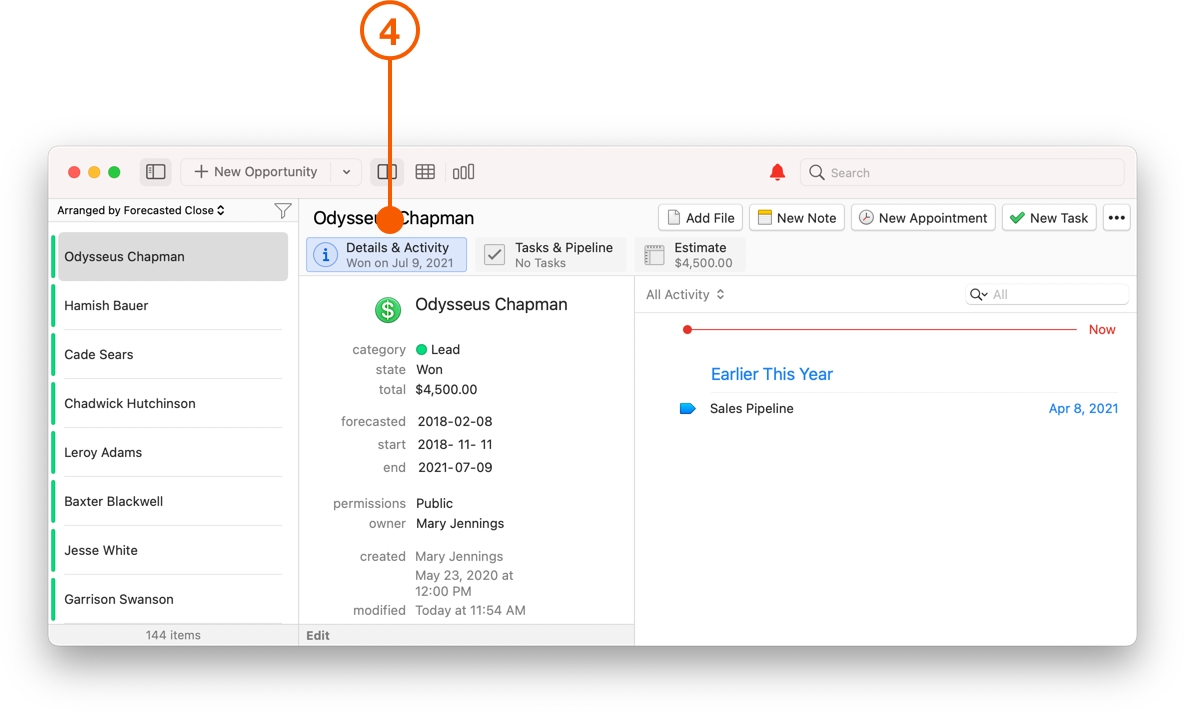
Now when you click the Details & Activity tab you will see that the total field matches the estimate total.
Pro Tip:
Frequently adding the same products or services to your Estimates?
Add them as reusable line items in Daylite > Preferences > Products and Services.
Once you have the basics down, it's time to classify the Opportunity. Classifying your Opportunities is where Daylite sets itself apart. With Categories and Keywords, you can sort, filter, and segment your Opportunities.
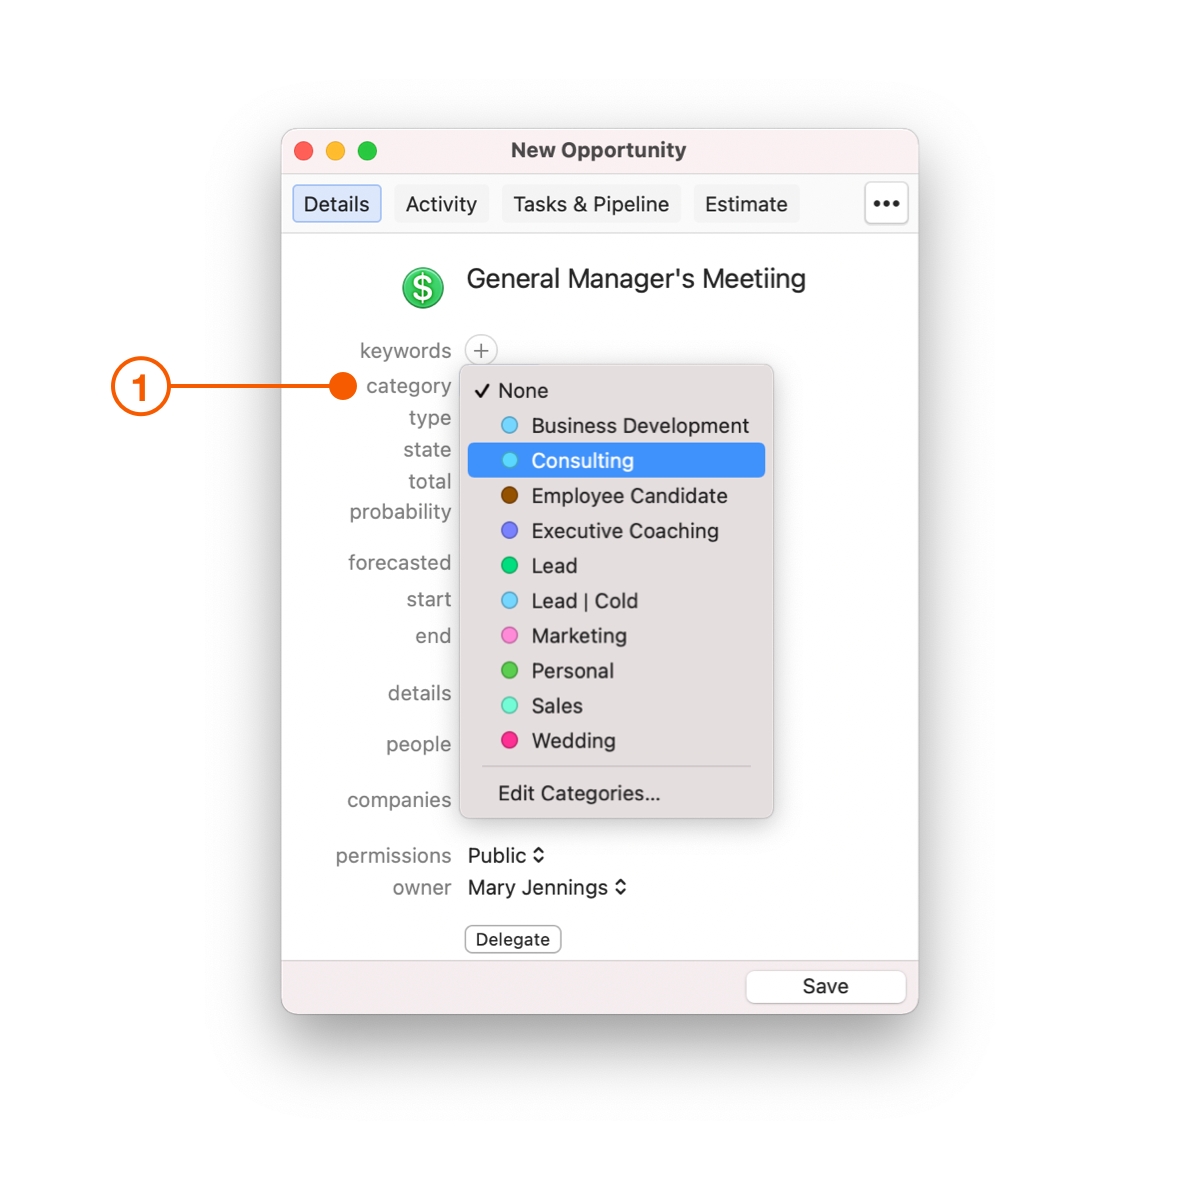
Category
A Category is the top-level classification in Daylite. An Opportunity only has one Category, so think about how you want to organize your Opportunities.
To choose a Category, open the Category pop-up menu. If no Category fits, click Edit Categories... to open the Daylite Category Preferences and create a new Category.
Here are a few examples of how you can categorize your Opportunities.
Products or services your leads are interested in buying
Personal Coaching
Group Training
Speaking Event
Types of leads
Hot
Cold
Sources for your leads
Facebook
Email Marketing
Trade Show 2019
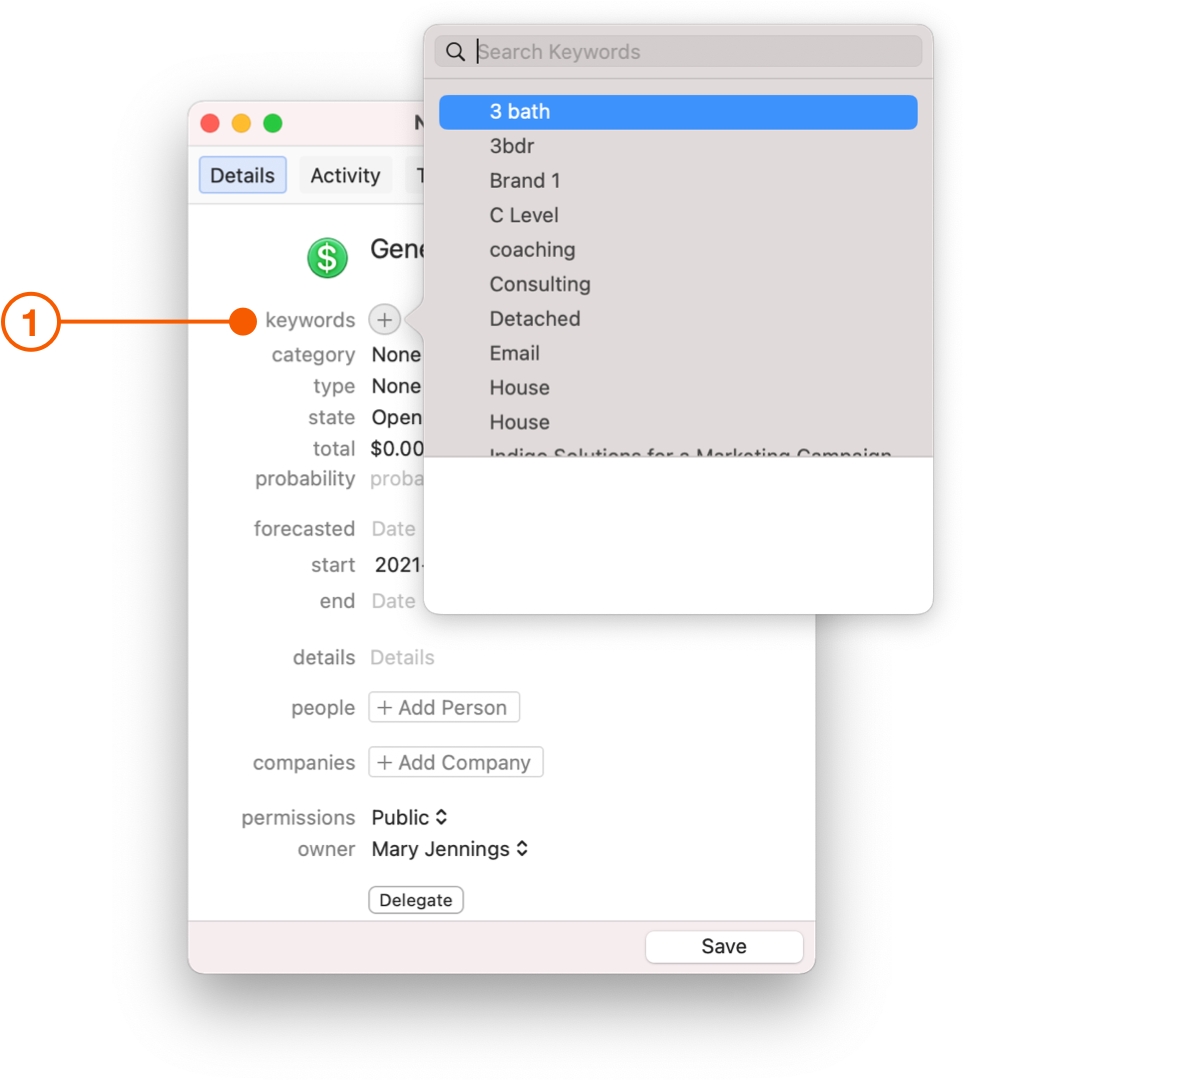
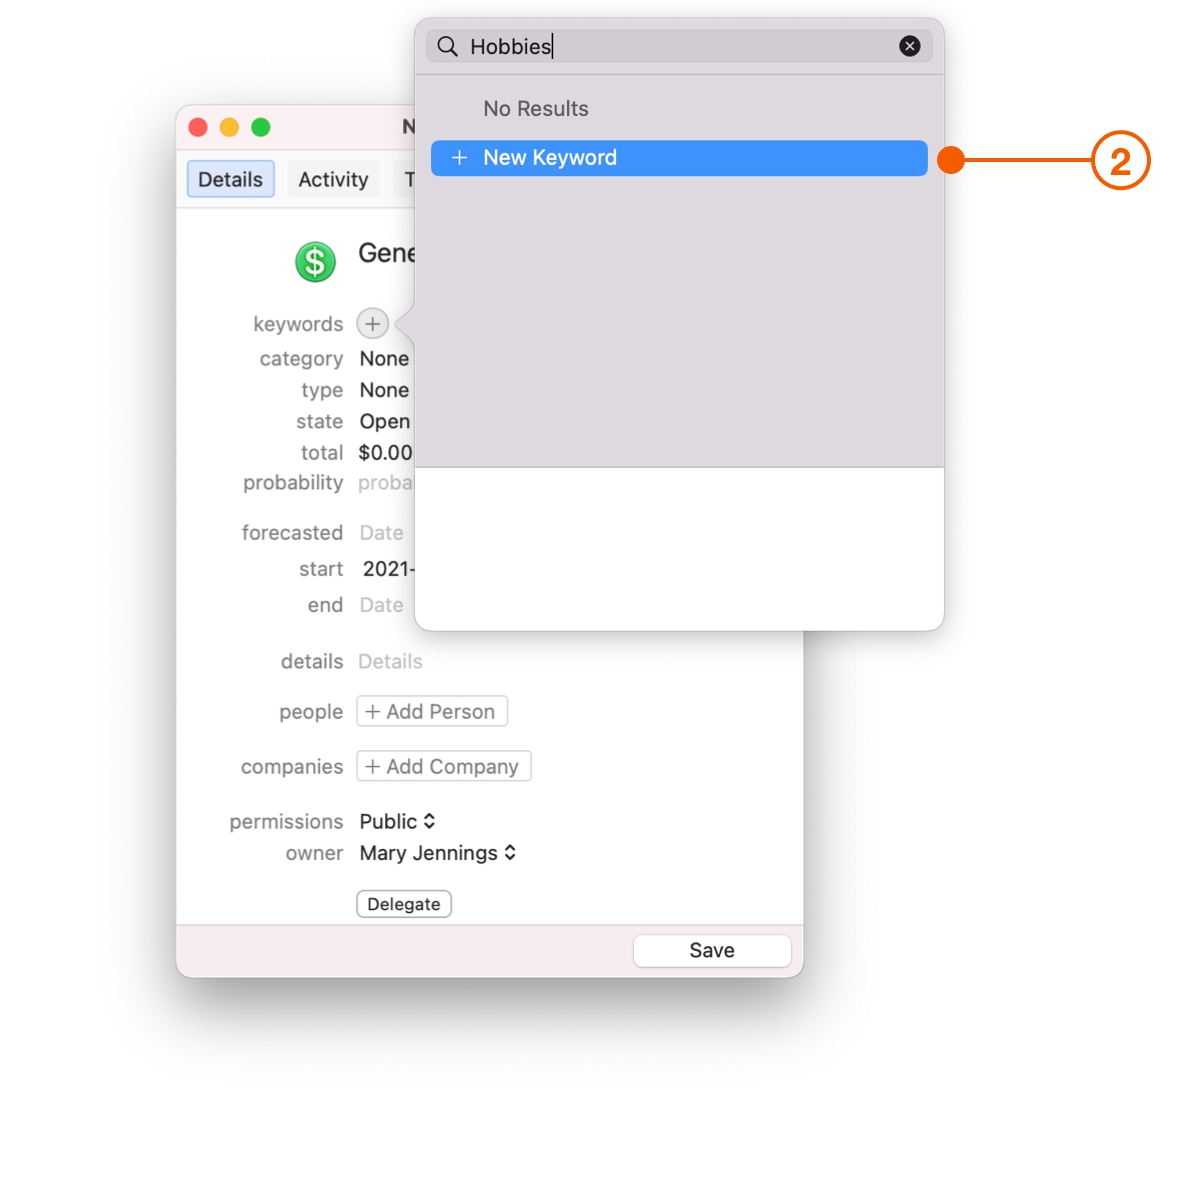
Keywords
Keywords are a more flexible way to classify your Opportunities. An Opportunity can have as many Keywords as you want, so you can use them for multiple reasons.
To choose a Keyword, click the + button.
If no Keyword fits, type the Keyword you wish to use, then click New Keyword... to create and add it to your Opportunity.
Here are a few examples of how you can use Keywords to classify your Opportunities:
Type of client
VIP
Repeat customer
Family/Friend
Buying preferences
Additional Photographer
2 Week coaching session
2 bedroom
Specific marketing campaigns
10% off referral
re-targeting ads
holiday landing page
Roles
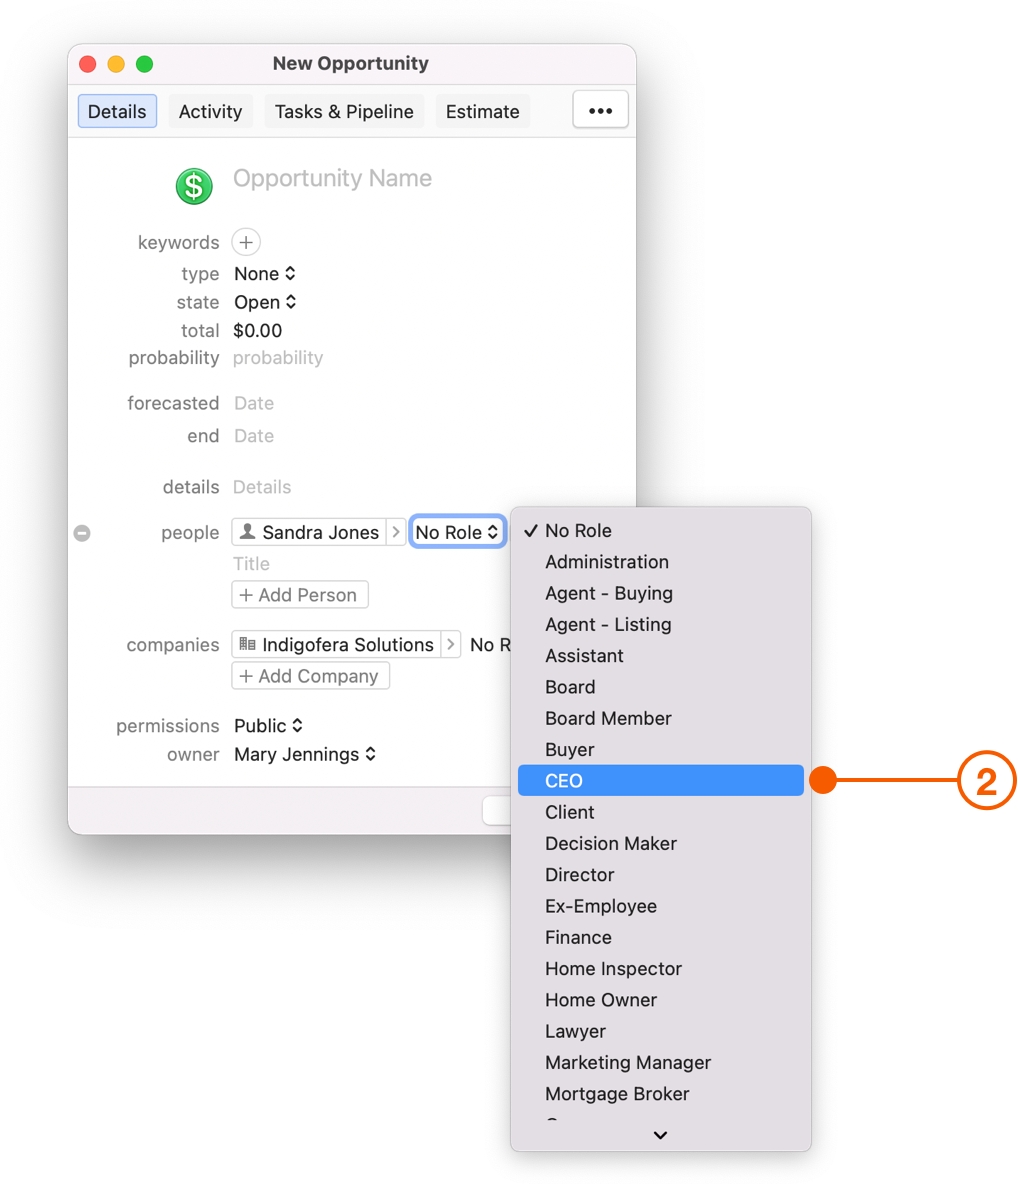
When linking people to an Opportunity, you could begin by adding members of your team, like the lead salesperson or account manager, then add your customers.
Next assign their roles, such as decision maker, or IT Manager. Now when you contact a client, you can make sure you're speaking to the right person at the right time.
Now that you've added all the essential details, classified your Opportunities, and added everyone's roles, go ahead and save your Opportunity.
Wrap Up
With all the details about an Opportunity captured in one place, your Team now has the tools to close more deals and take your business further.
Click here to Organize the Moving Pieces In A Deal and Build a Streamlined Sales Process.
Last updated