Track and Execute the Next Steps for your Projects
If your business requires you to juggle a lot of active Projects at the same time, keeping up with all of your Tasks and next steps can be cumbersome. Your Home Screen may become overwhelming, and clicking through all your Projects every day to find Tasks needing your attention can be tedious. Thankfully, Daylite gives you a better way to focus on just the Projects needing your attention.
Create Project Dashboards Using Smart Lists
Using Daylite's built-in Smart Lists to create Project dashboards can help you stay organized in ways you never dreamed possible. You can create Project dashboards that let you check in on Tasks that are due, overdue, or upcoming, so you can decide where your attention needs to be focused.
View Projects with Due and Overdue Tasks
Missing deadlines can cost your business money. Creating a dashboard of all your Project Tasks that are due and overdue gives you insight into what you need to work on next.
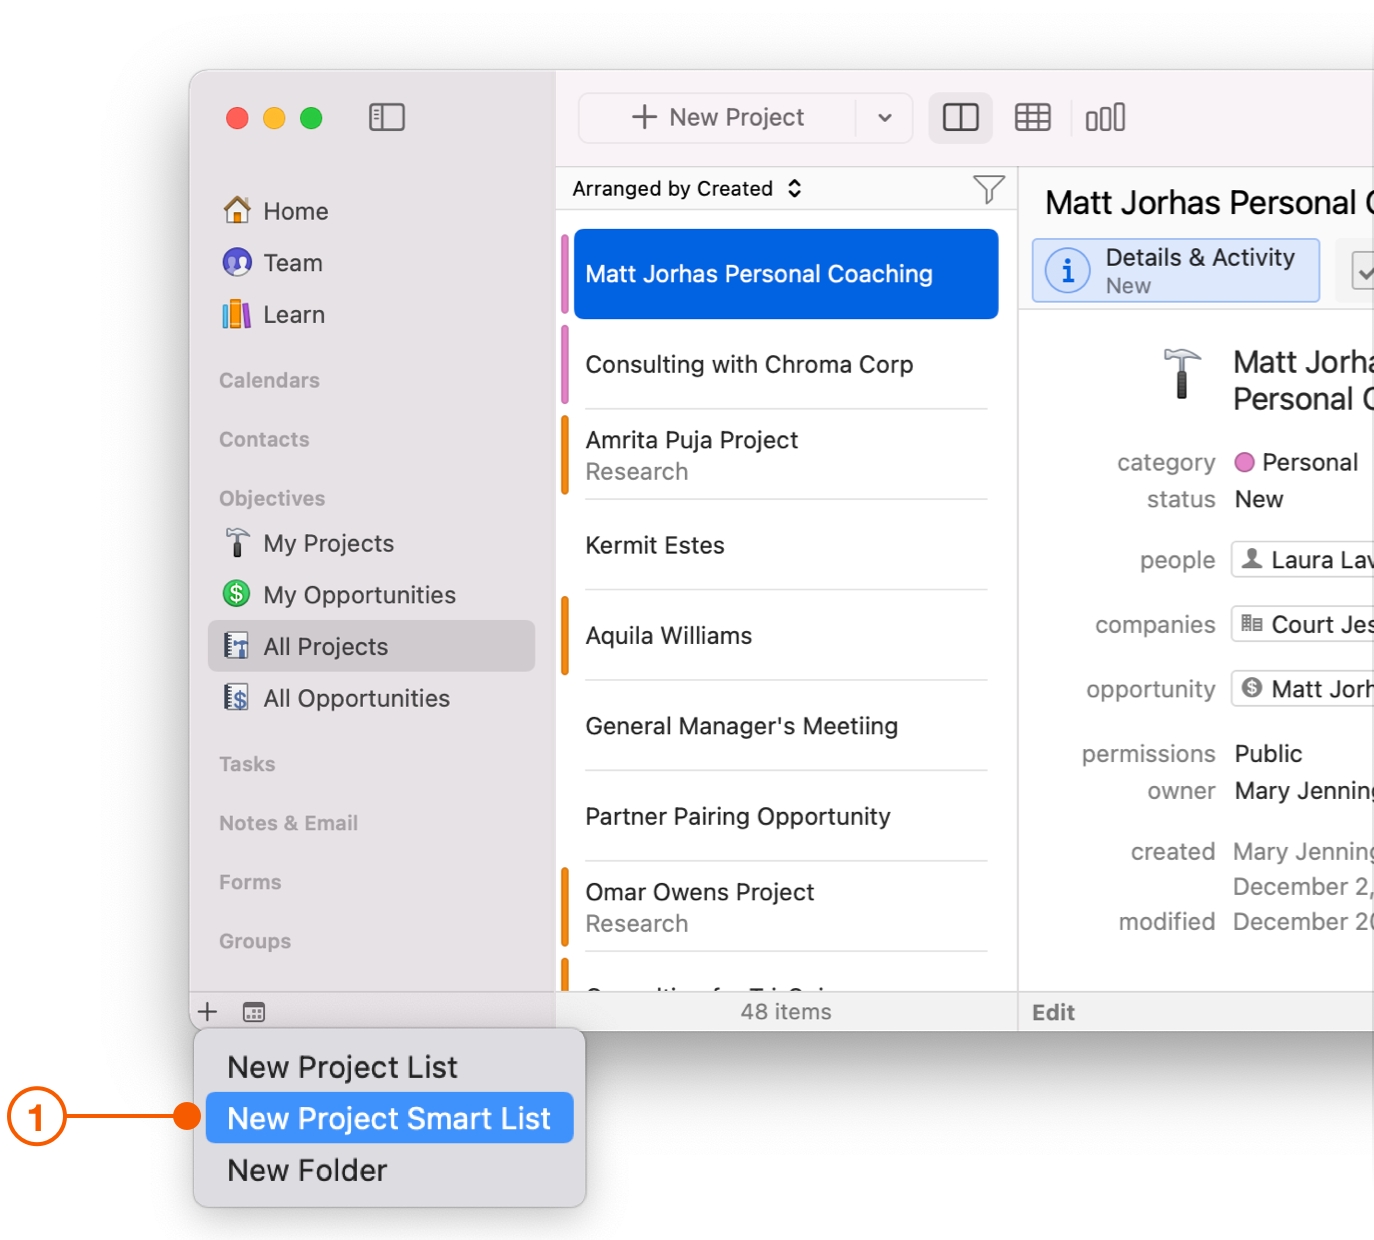
Select All Projects from the Daylite Sidebar, then click the + button in the bottom left of the Sidebar and choose New Project Smart List.
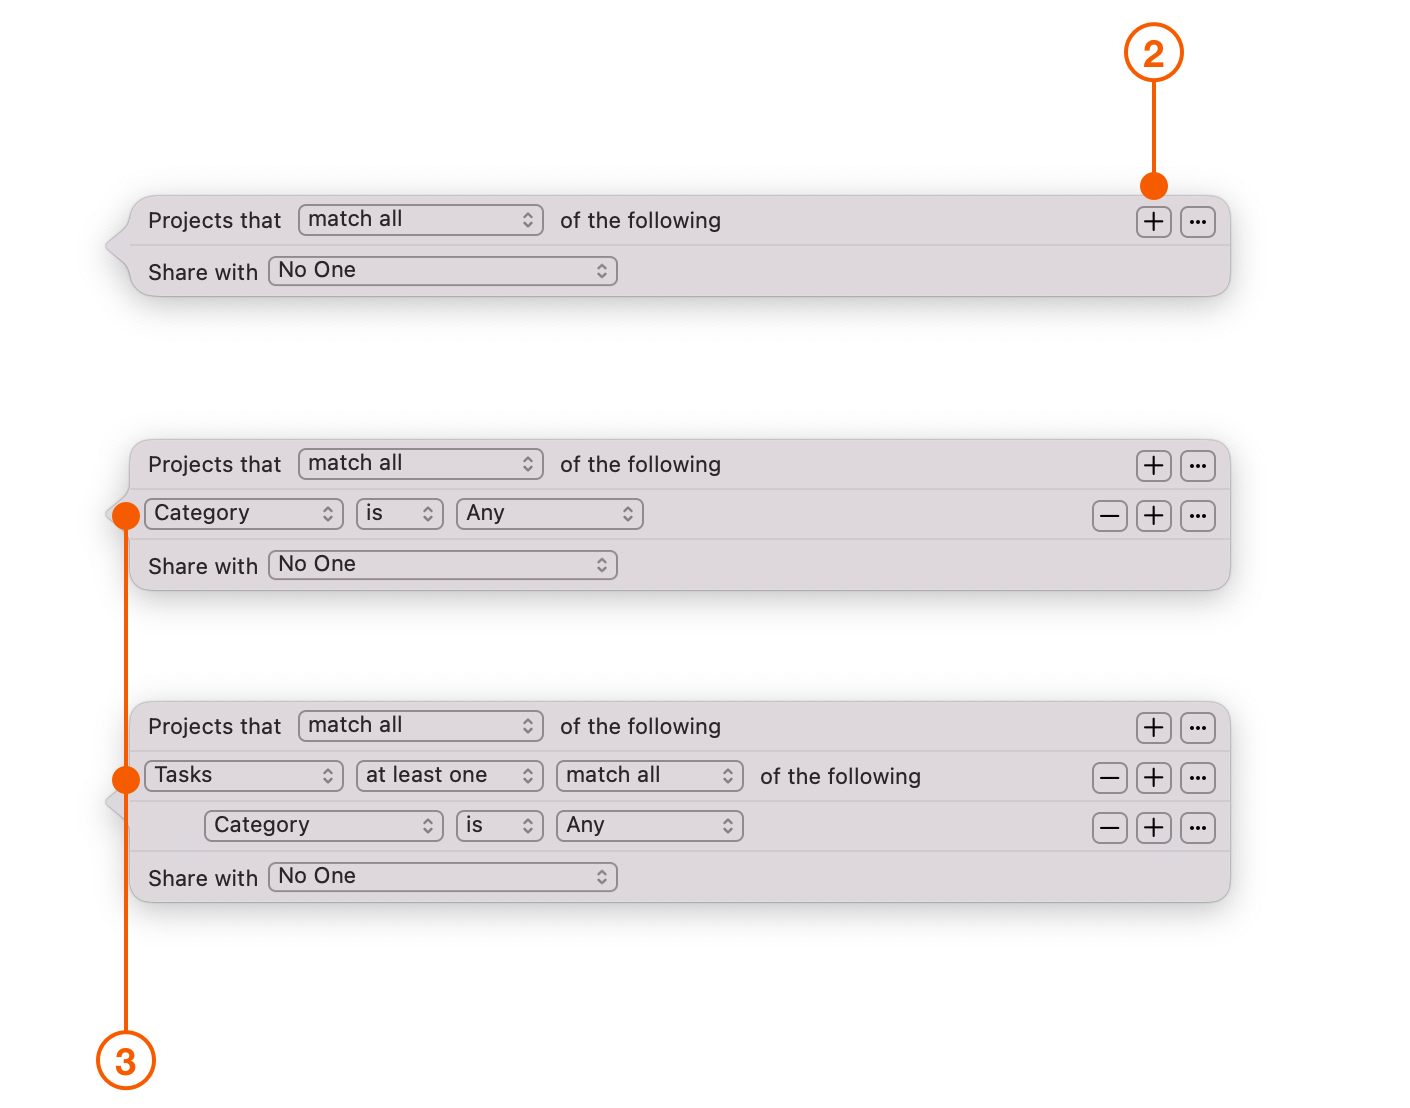
Click the + button in the Smart List popover to add a new filter.
Change the Category filter to Tasks.
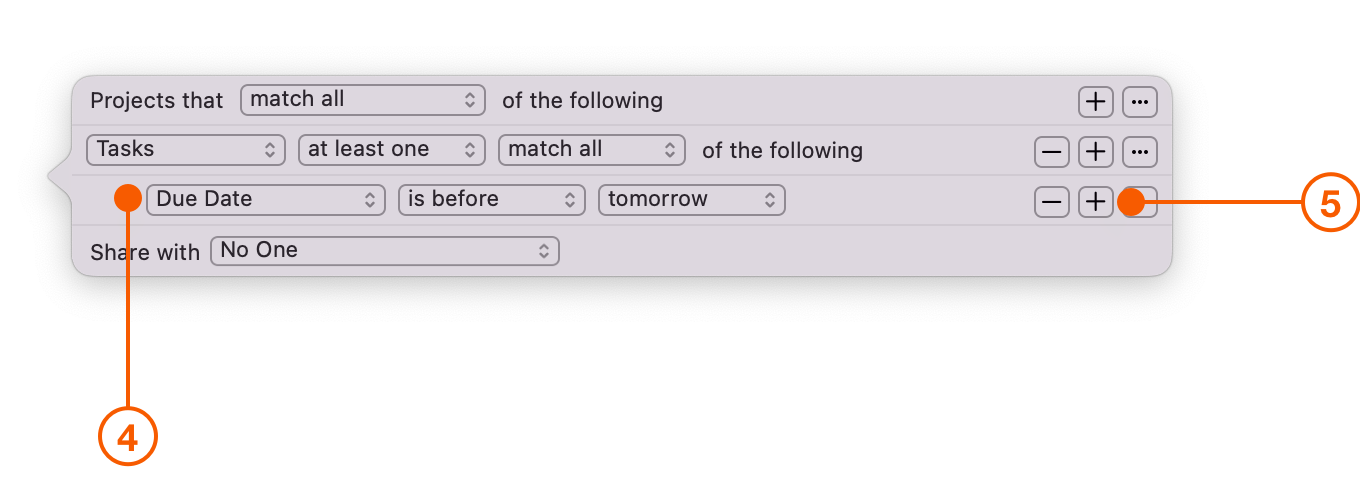
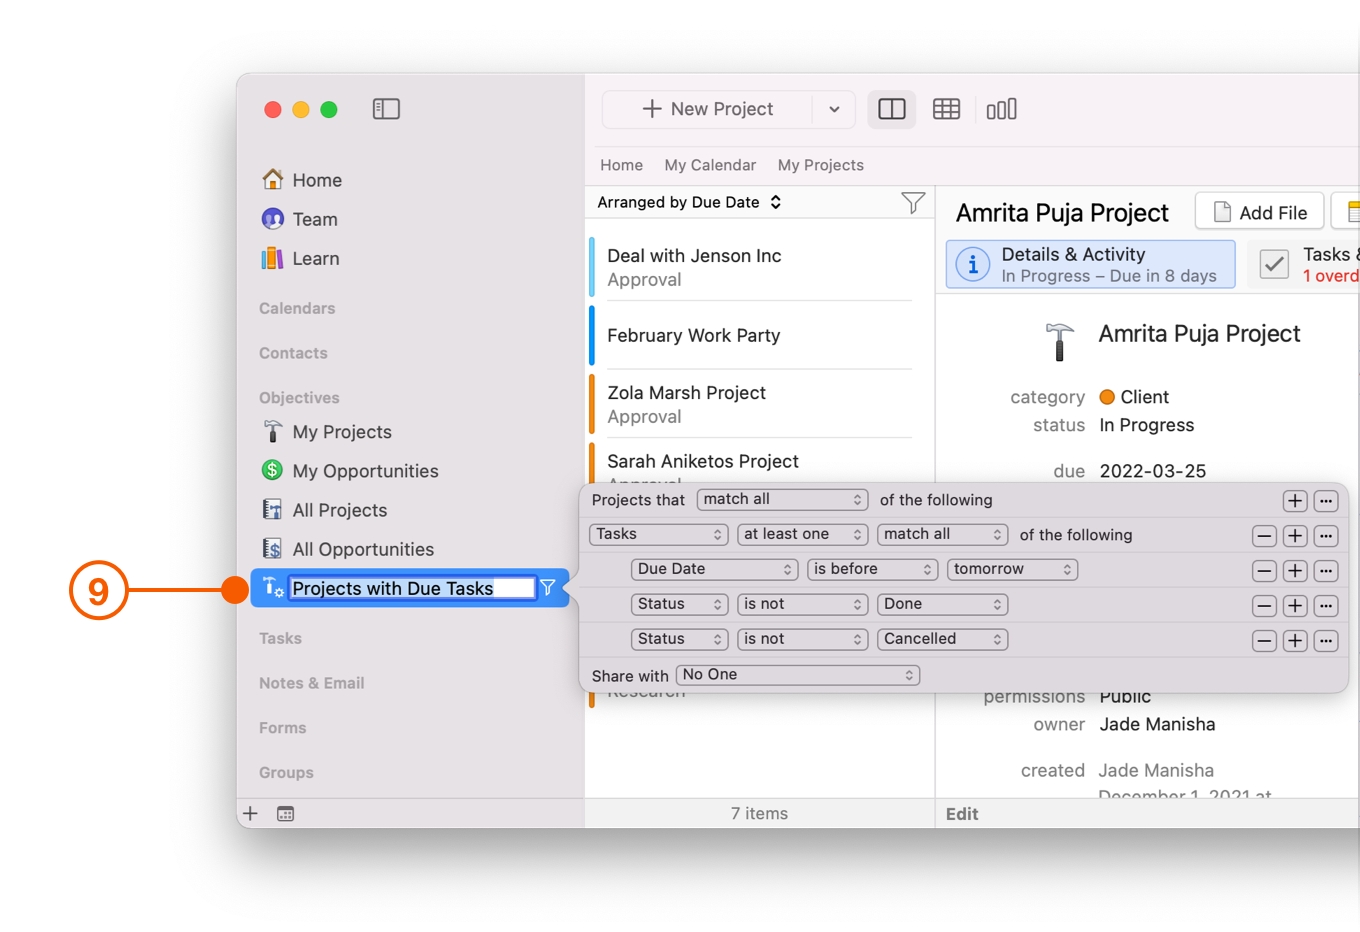
Change the second filter to Due Date is before tomorrow.
Click the bottom + button to add another filter.
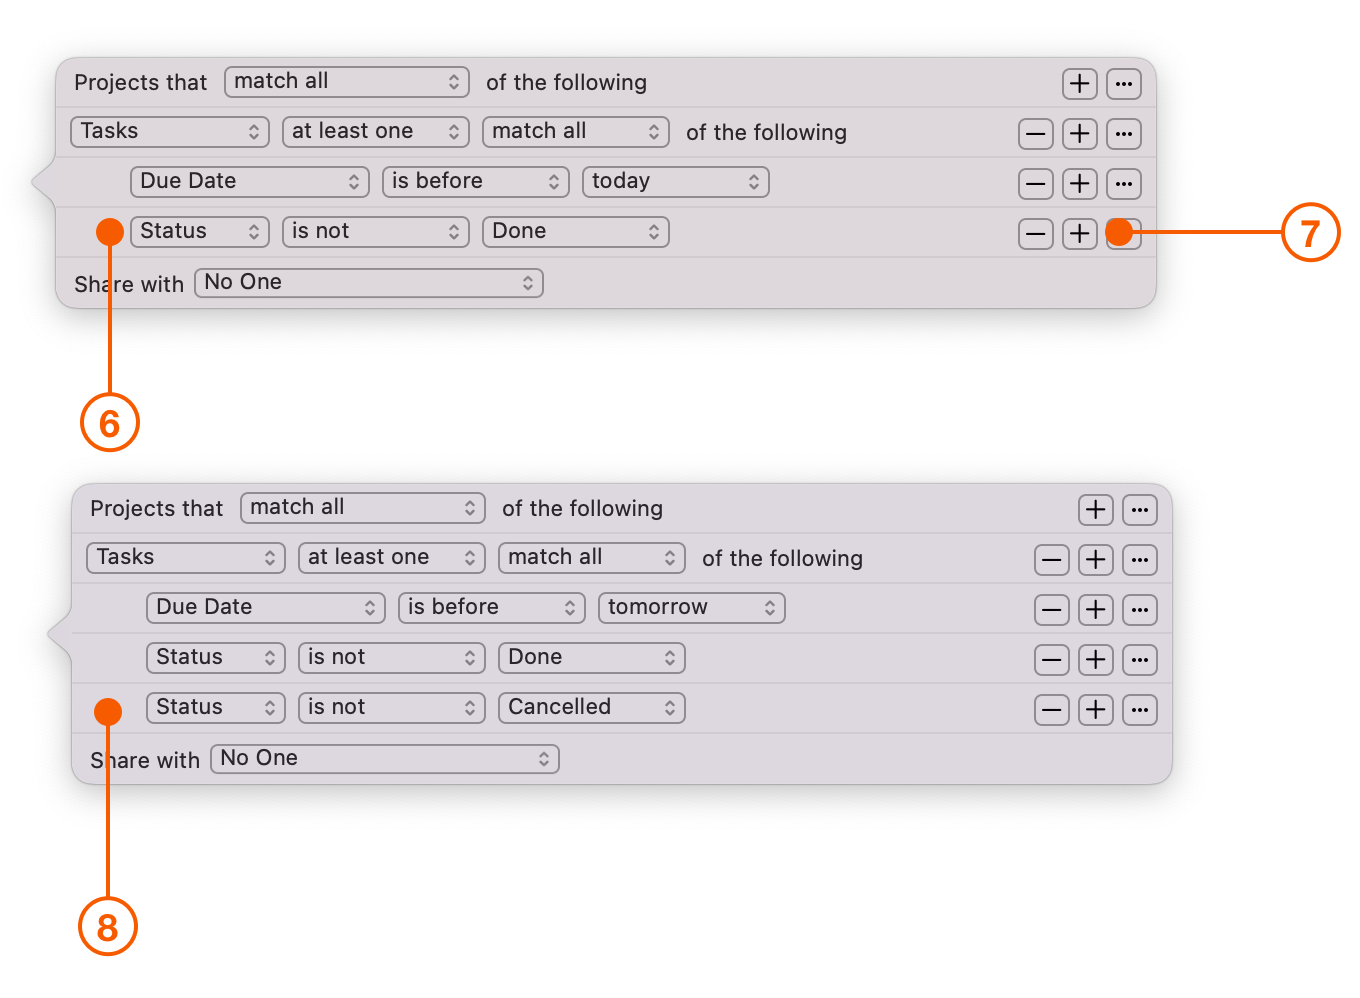
Change the third filter to Status is not Done.
Click the bottom + button to add another filter.
Change the fourth filter to Status is not Cancelled.
Double-click on the Smart List name and change it to Projects with Due Tasks.
View Projects with Upcoming Tasks
Prioritizing your upcoming Tasks becomes easier when you can see them all in one location. Creating a dashboard of Projects with Tasks due in the next seven days helps you stay better organized.
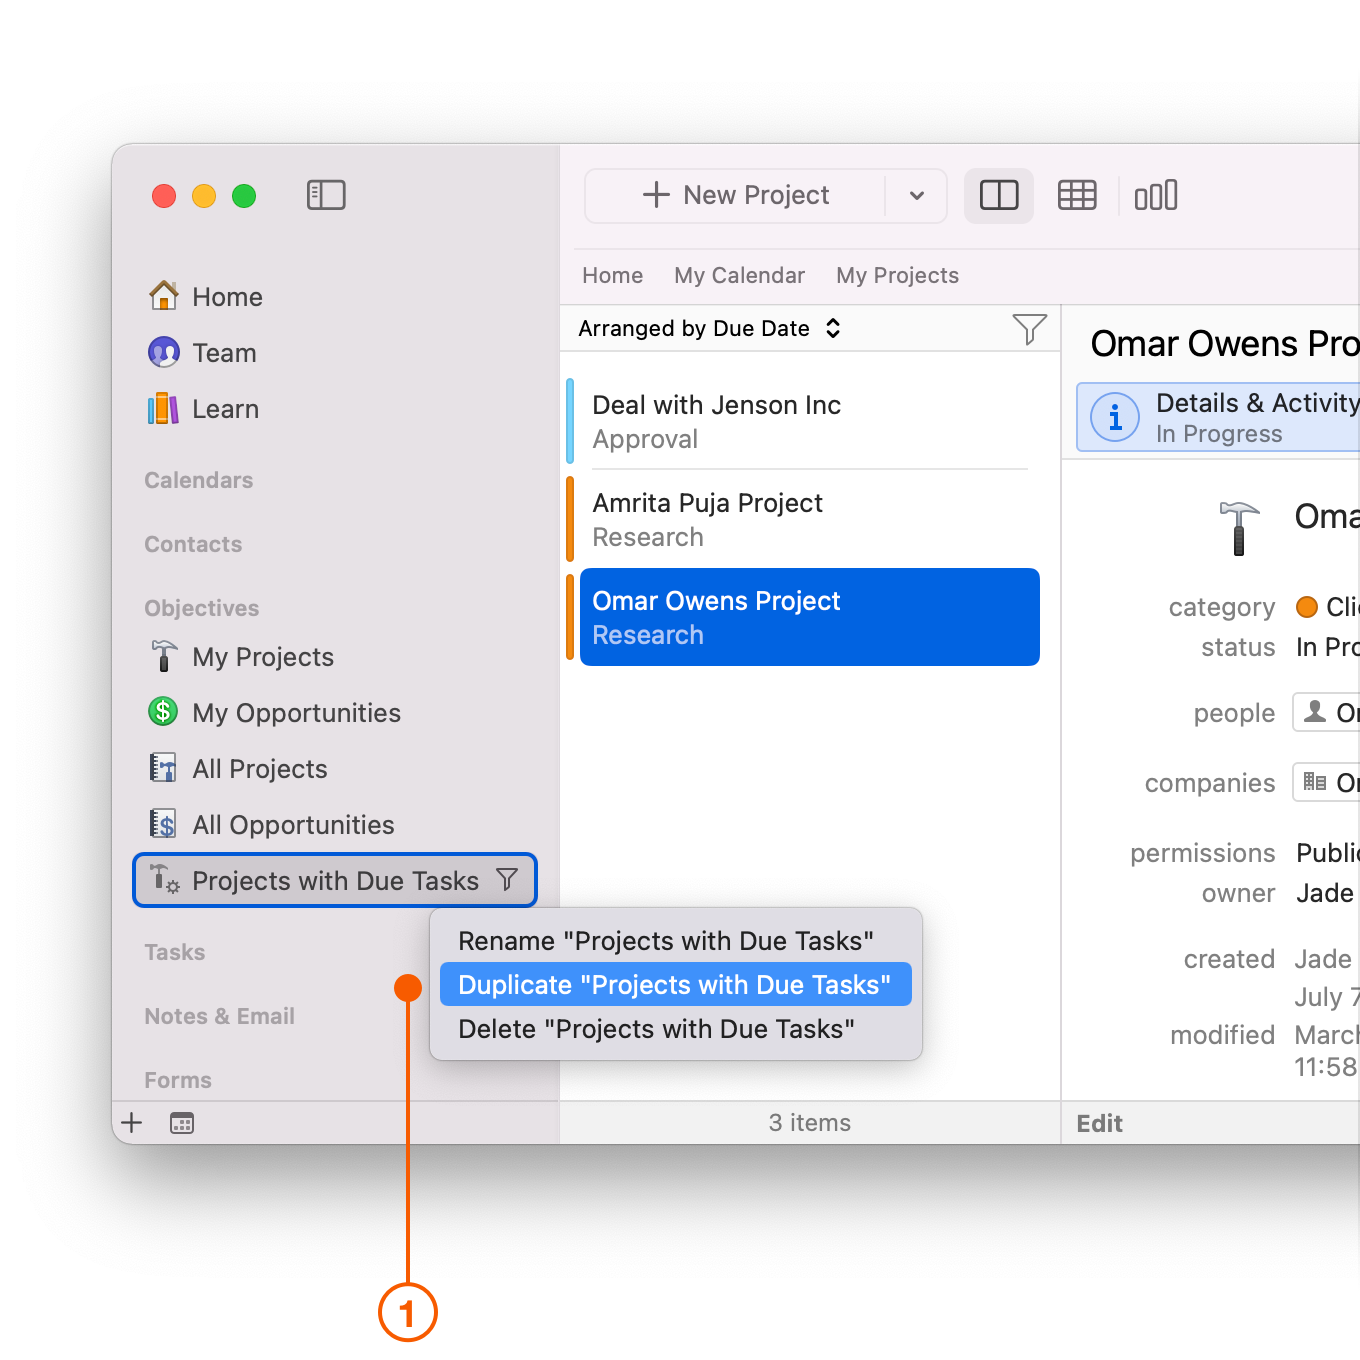
Control-click or right-click on the Smart List you just created, in this case Projects with Due Tasks, and choose Duplicate.
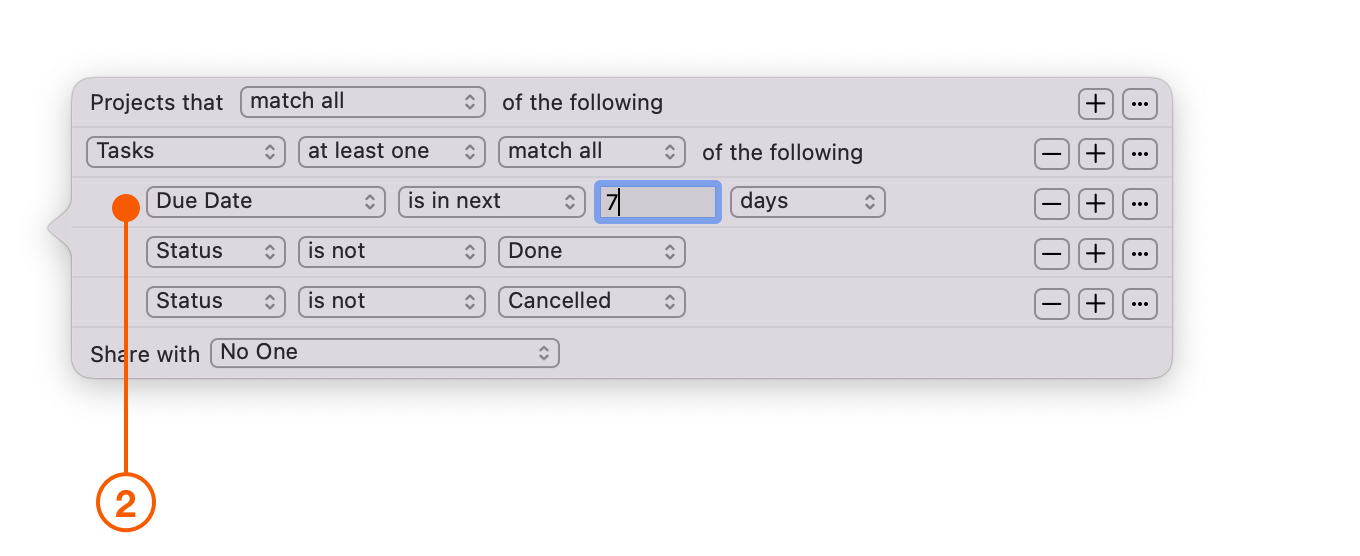
Change the Due Date filter to Due Date is in next 7 days.
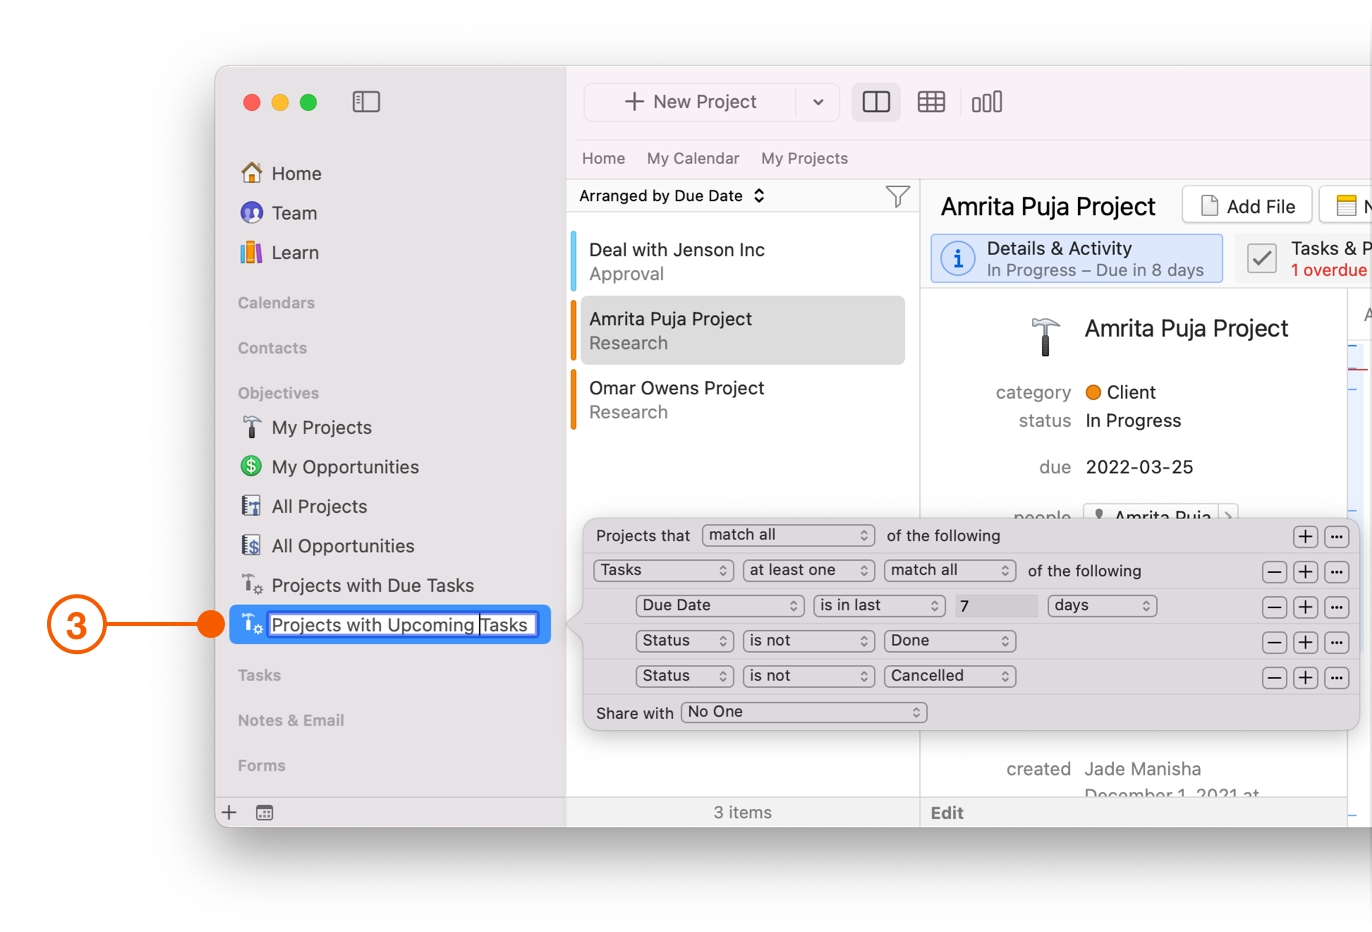
Rename the new Smart List to Projects with Upcoming Tasks.
Review Your Project Dashboard Daily
Forming good habits takes time and repetition, and having the right system in place sets you up for success. Viewing your Projects with Due Tasks dashboard at the beginning of each day allows you to identify the Tasks for each Project you need to focus on.
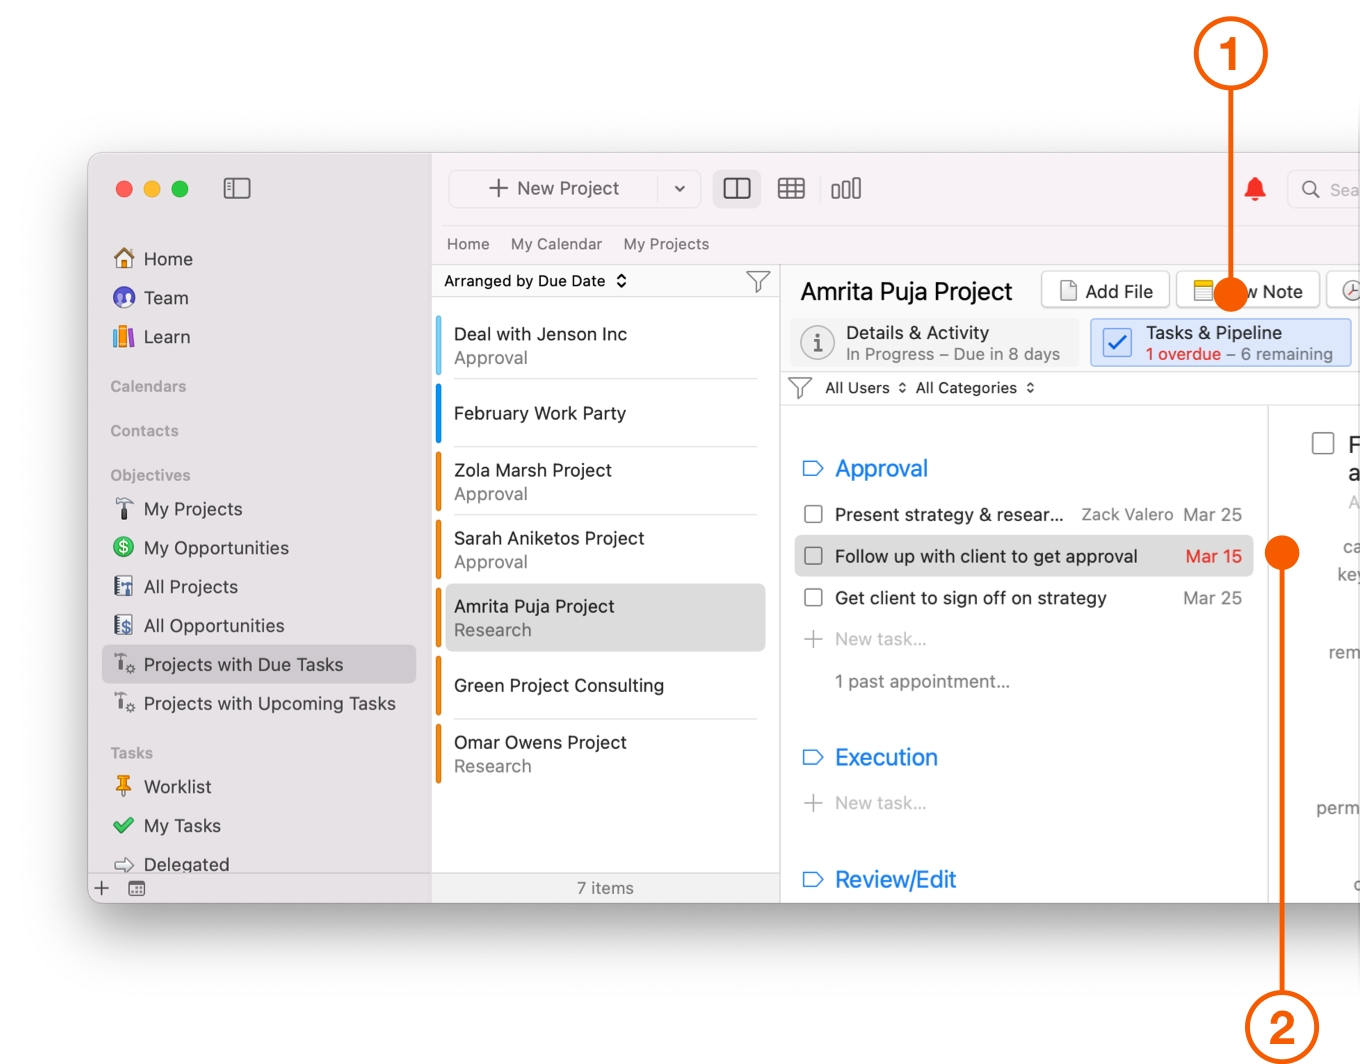
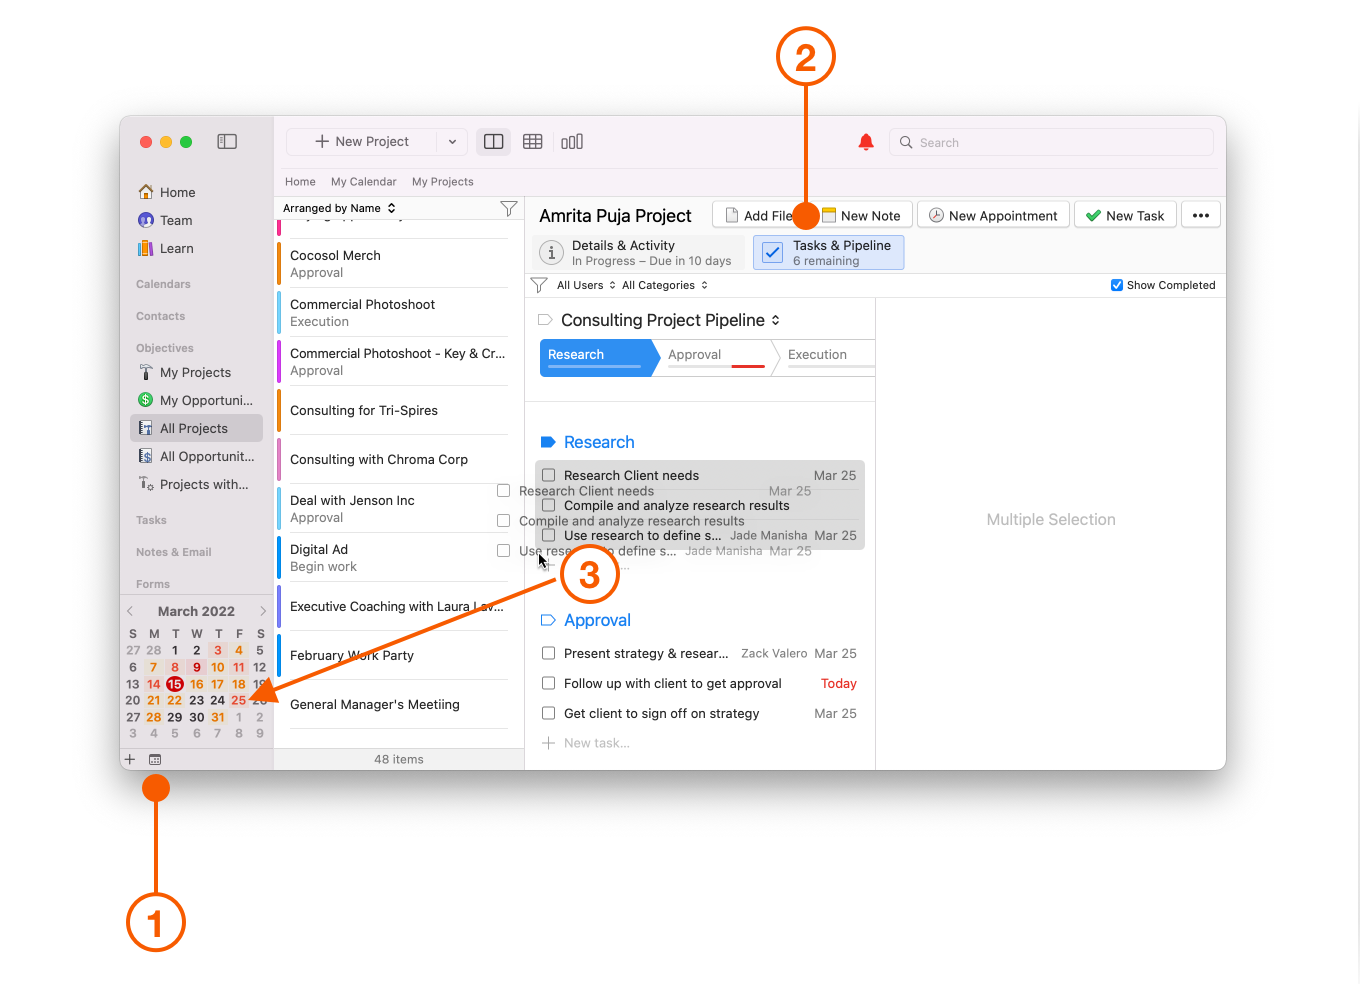
Remember to check your Projects with Due Tasks dashboard every day to stay on track and see what needs to be done.
Select the Project you want to view from your Projects with Due Tasks list, then click the Tasks and Pipeline tab. The Tasks and Pipeline View lets you see all of your Tasks grouped by Task List or Stage, and shows any due tasks in red.
Complete your due Tasks and then move down through each other Project in the list until your dashboard is empty.
Use the Favorites Bar
Project dashboards can also be accessed by placing them in your Favorites Bar. Much like Apple's Safari web browser feature, you can drag your Project dashboard into your Favorites Bar for quick and easy access.
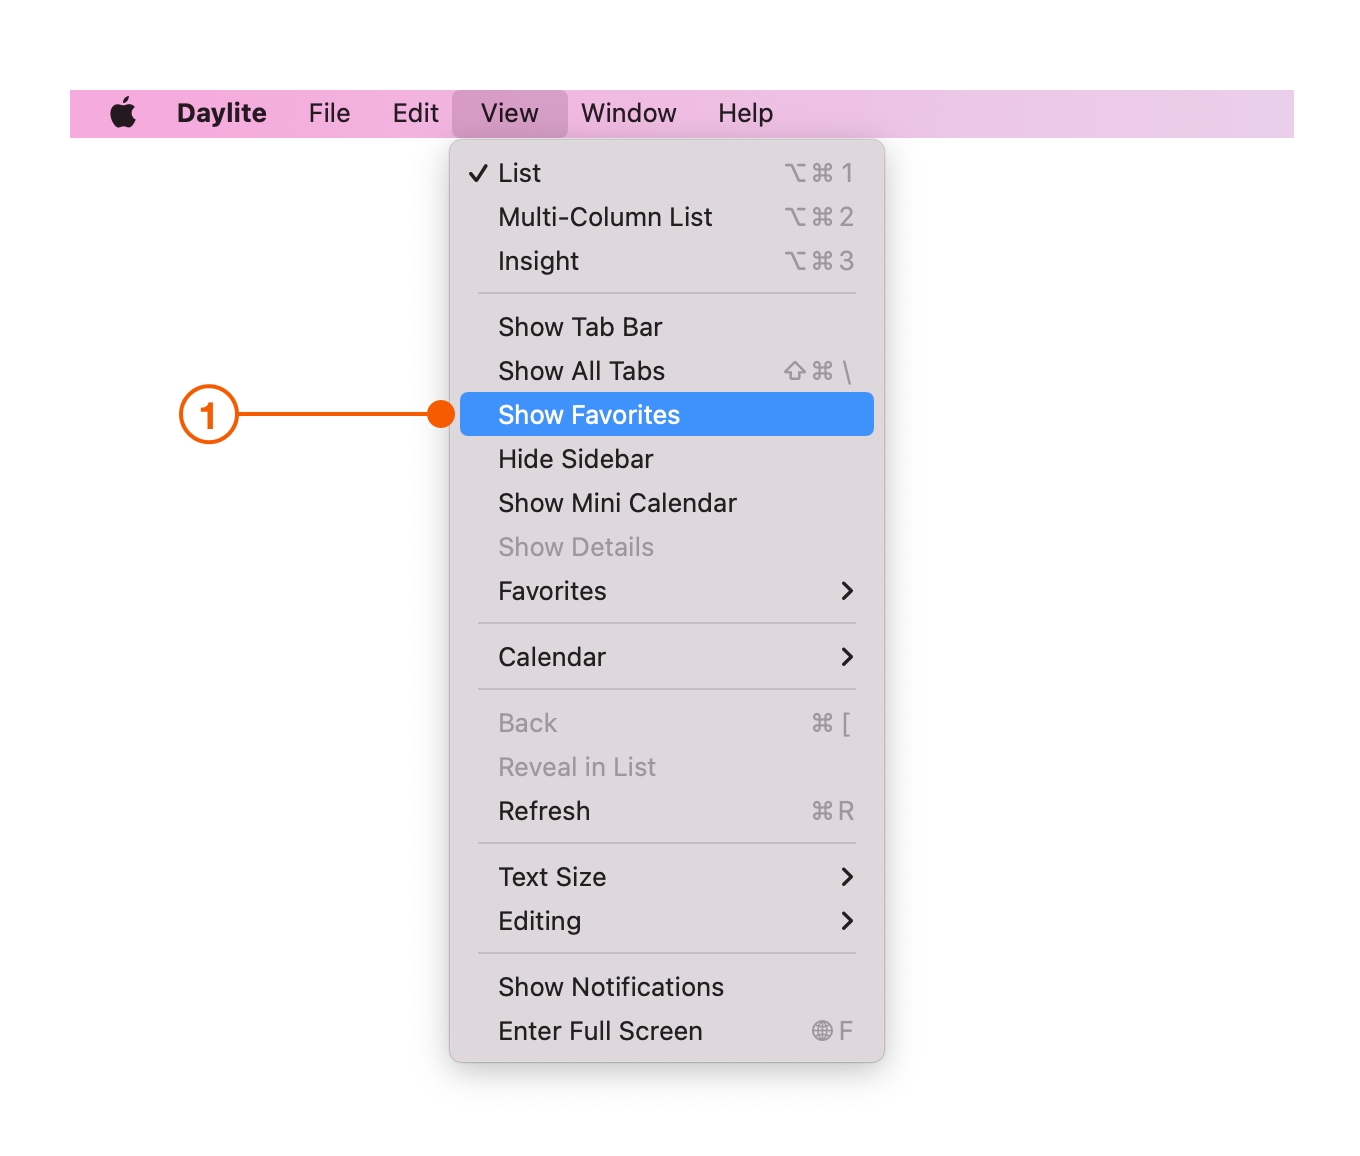
To check that your Favorites Bar is showing, go to Daylite > View > Show Favorites.
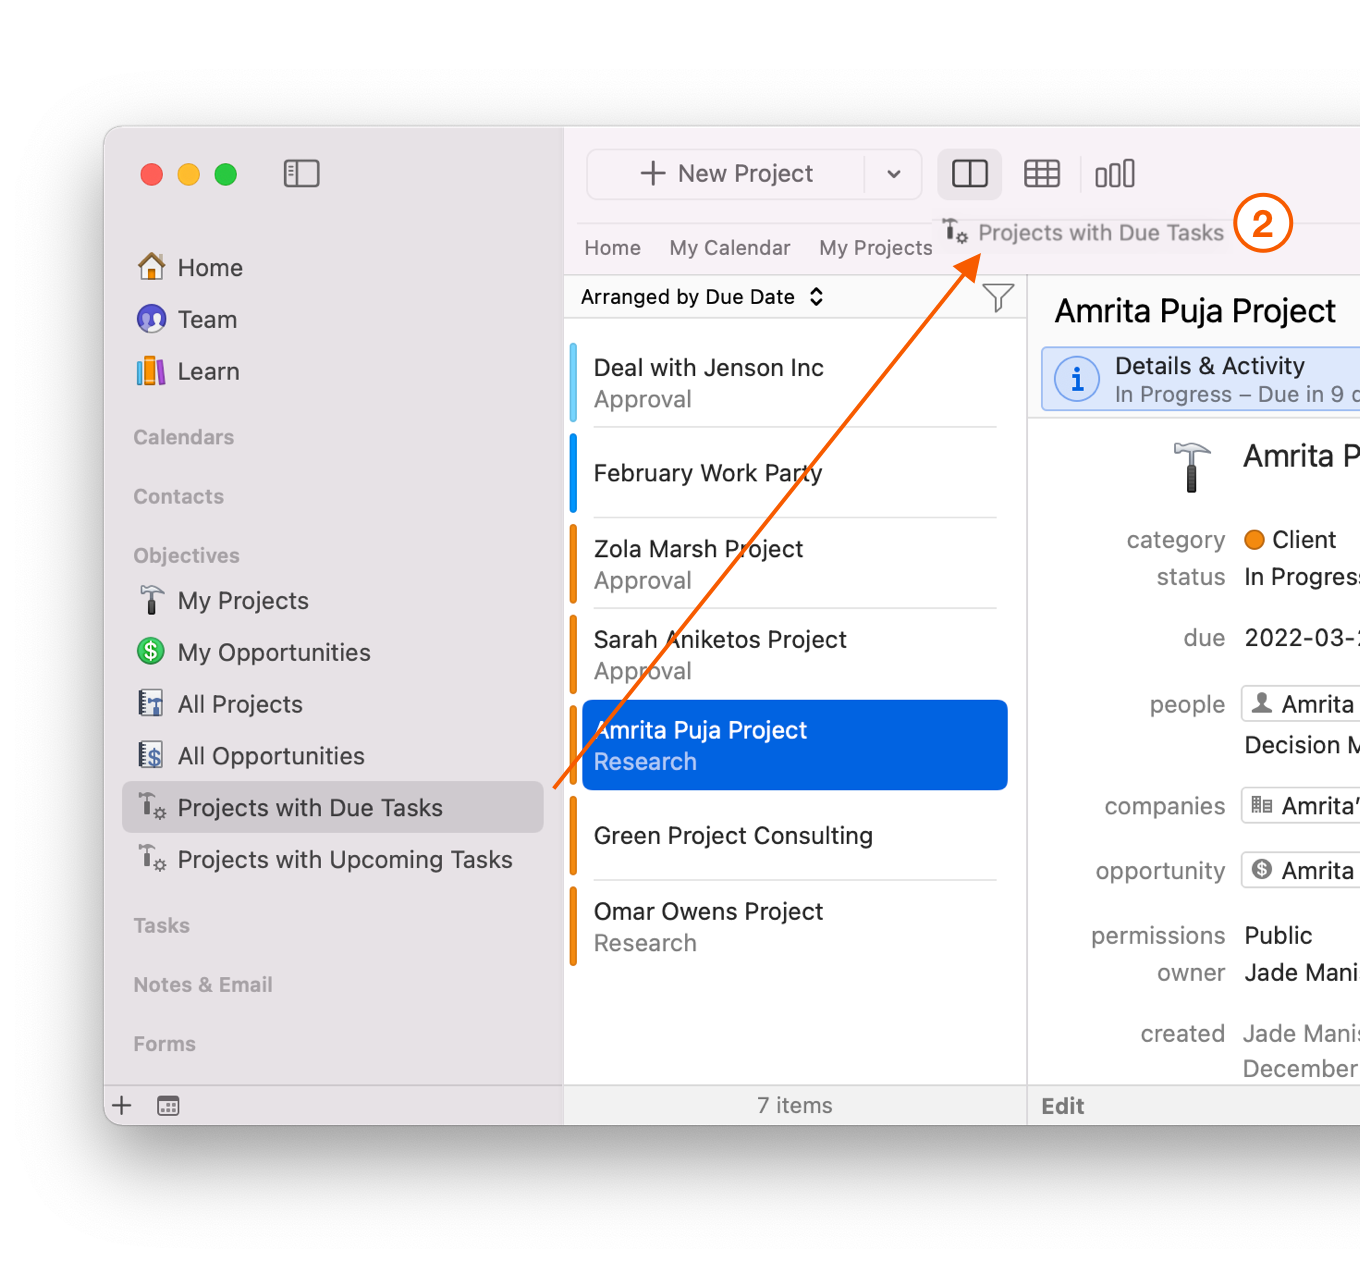
Drag and drop your Project dashboard into your Favorites Bar. You can re-order the Favorites Bar as needed.
Use the Multi-Column List
Depending on your business needs, or perhaps just personal preference, you may wish to view a Project dashboard using the Multi-Column List. This view gives you more control over the information you can see at a glance, as well as how you want to sort your list.
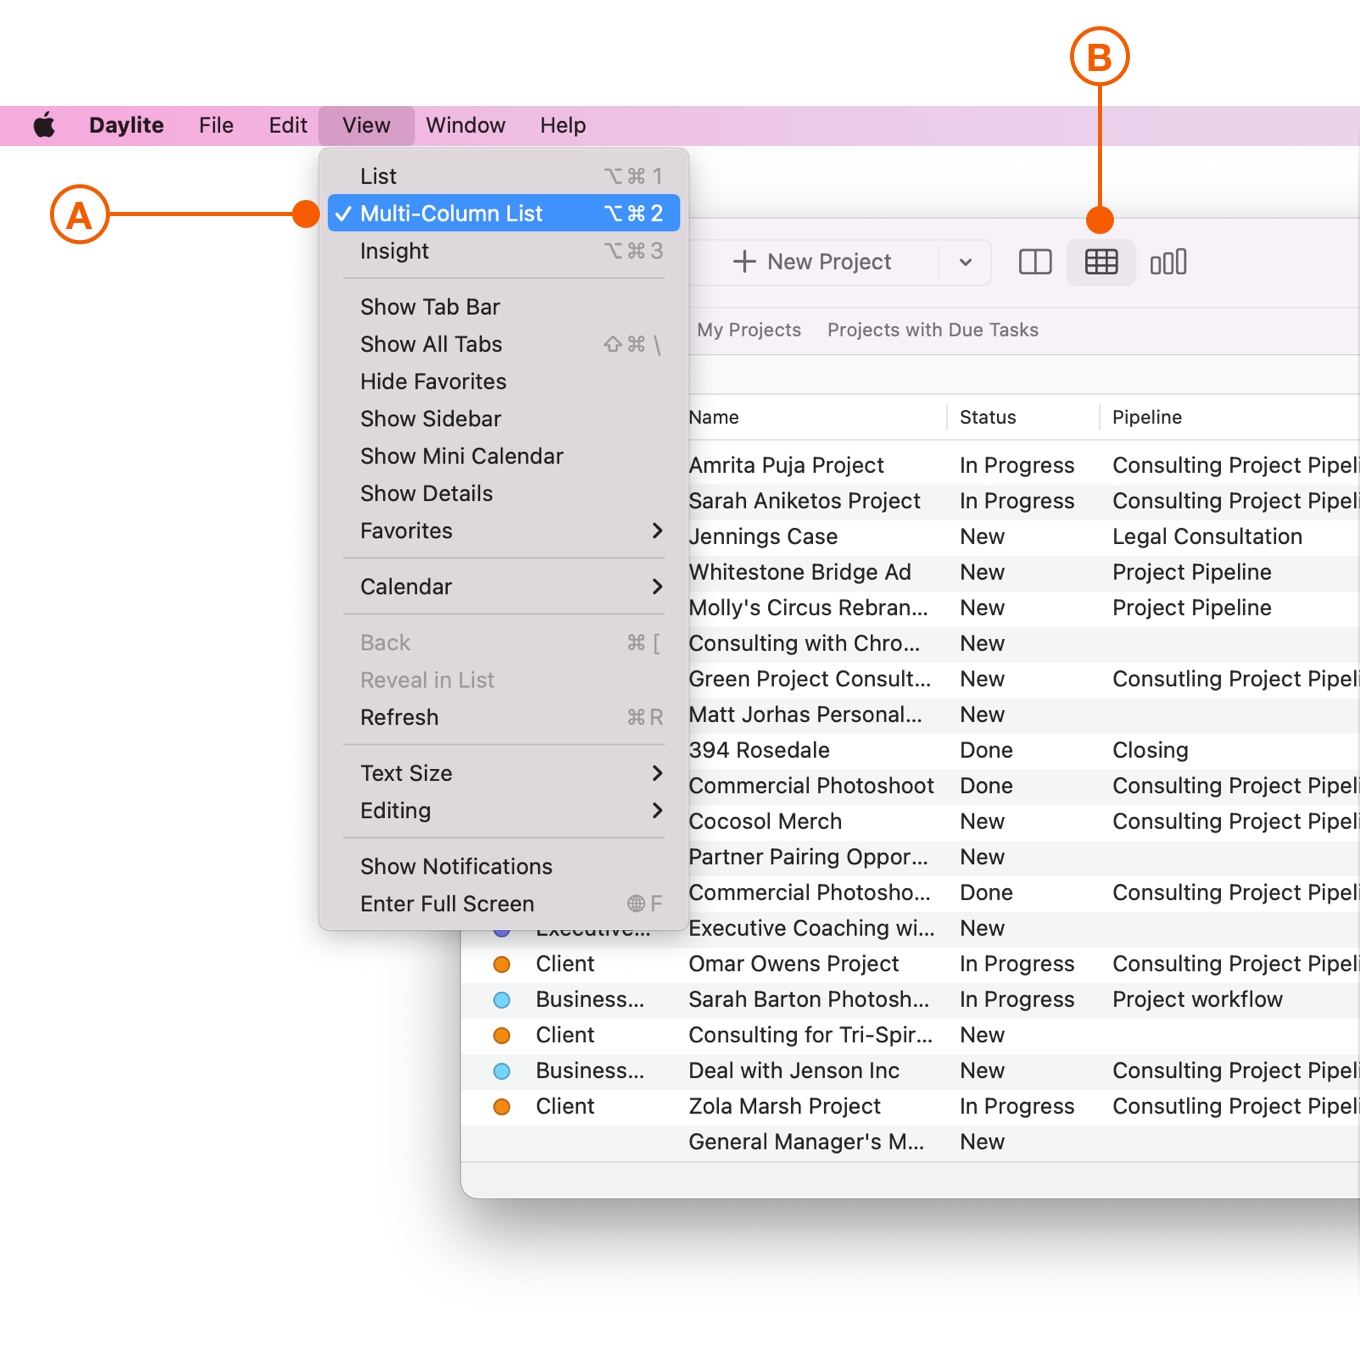
To view the Multi-Column List, you can either:
(A) Go to Daylite > View > Multi-Column List.
(B) Click the Multi-Column List icon in the Daylite toolbar.
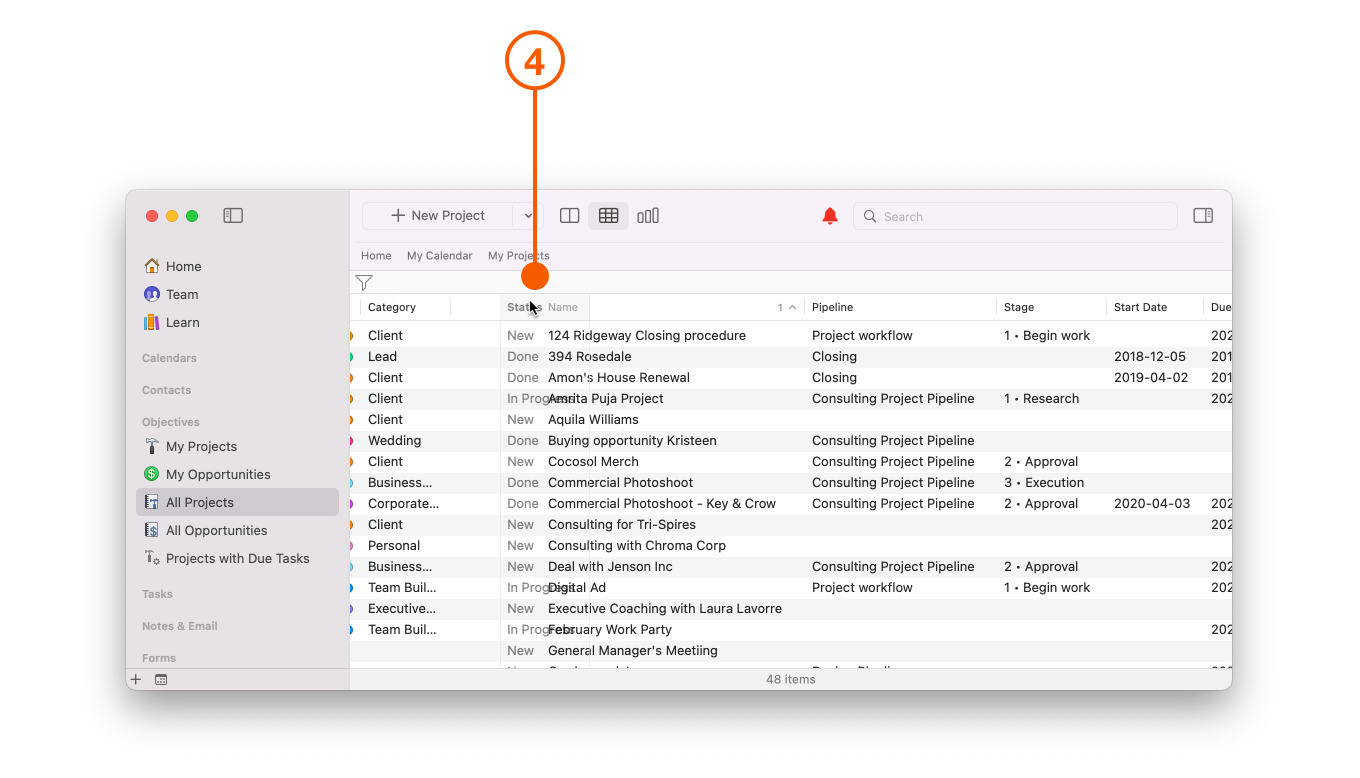
The Multi-Column List can be re-ordered by clicking on a column heading. For example, if you wanted to sort the list alphabetically by Name, you would click on the Name column. To reverse the sort, click on the column header a second time.
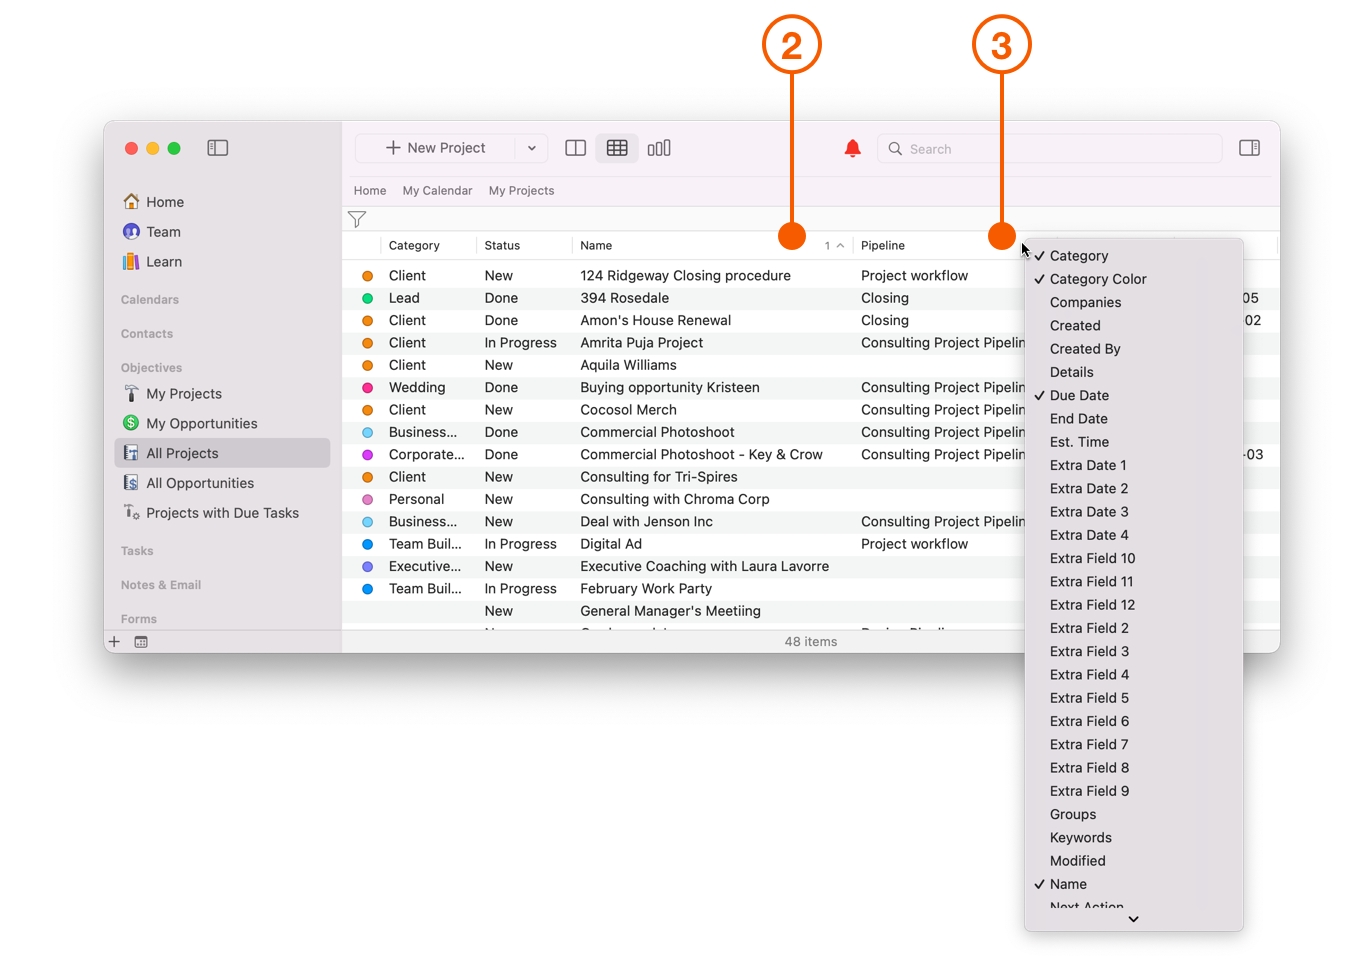
You can also Control-click or right-click anywhere on the header row to select from a menu of columns to show or hide.
Finally, you can drag and drop the columns into whatever order you wish.
Plan Your Upcoming Work
Planning how best to tackle upcoming work can be daunting, but it doesn't have to be. By utilizing Daylite's built-in Pipelines and Activity Sets to create repeatable processes, you remove the stress of having to remember every single step.
Set Due Dates in Your Pipelines and Activity Sets
If you've already created a Project Pipeline in the Daylite preferences, the next step is setting due dates on your Pipeline Tasks so you're reminded about all of your important Tasks at every Stage of every Project. If you haven't set up a Pipeline yet, check out the article Streamlining Your Projects. The steps below can also be followed to set due dates in your Activity Sets.
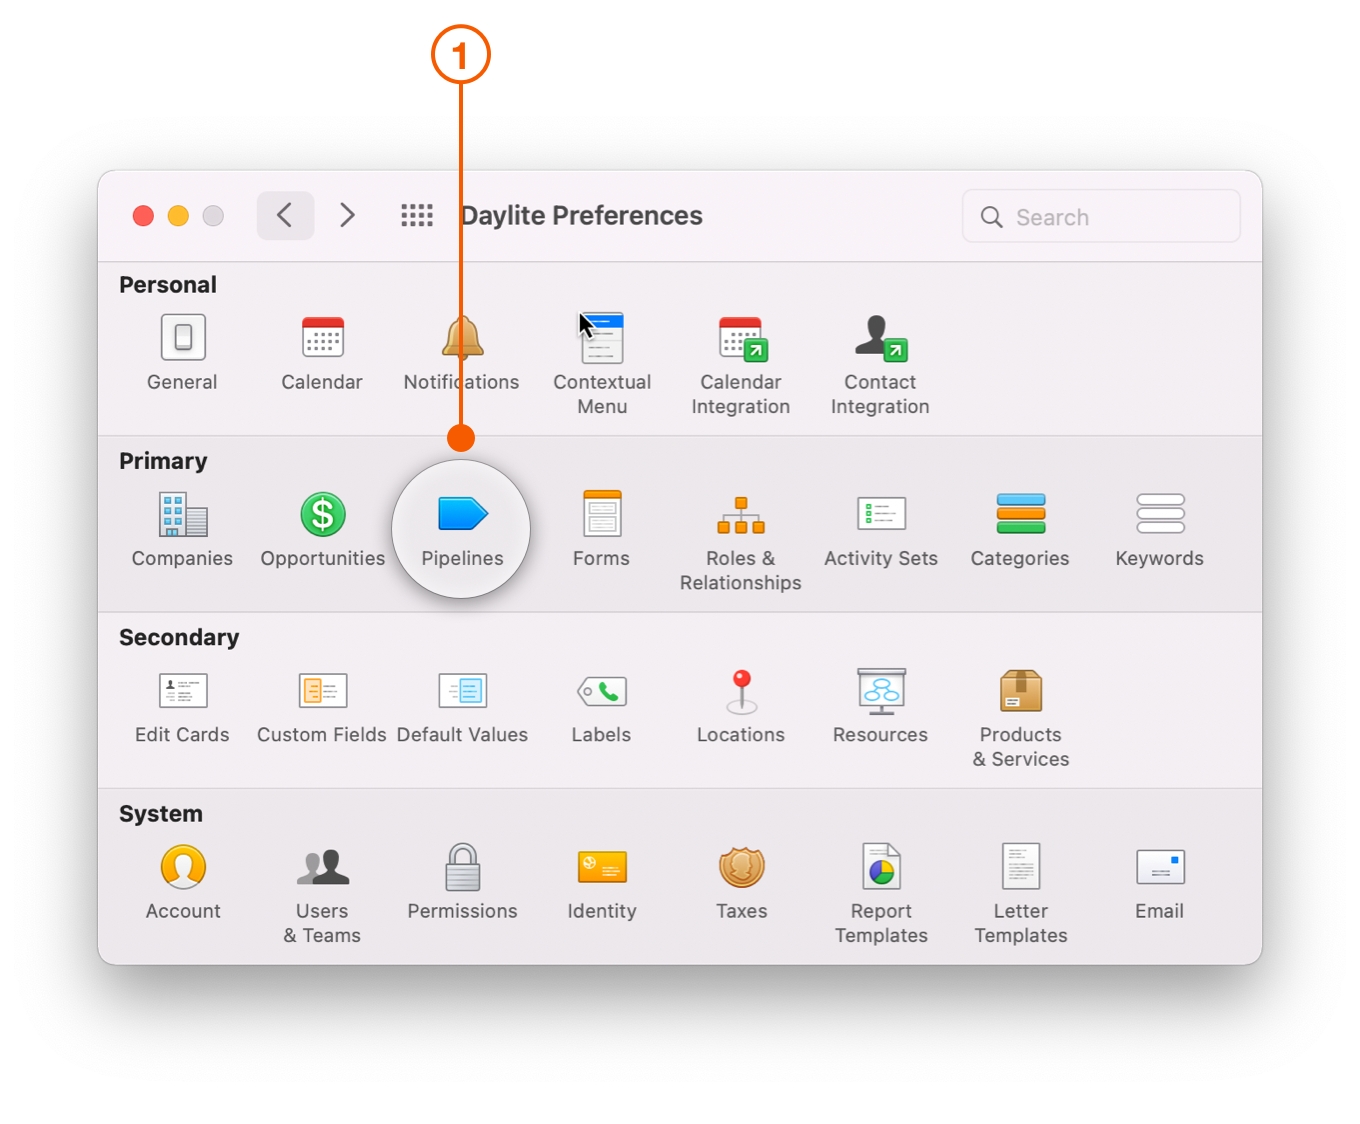
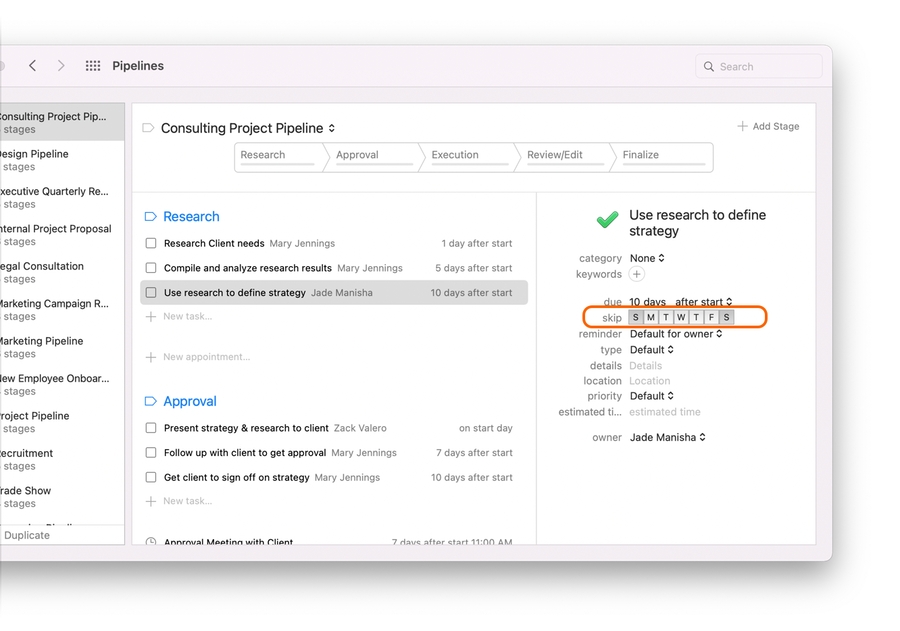
Go to Daylite > Preferences > Pipelines and select the Pipeline you want to edit.
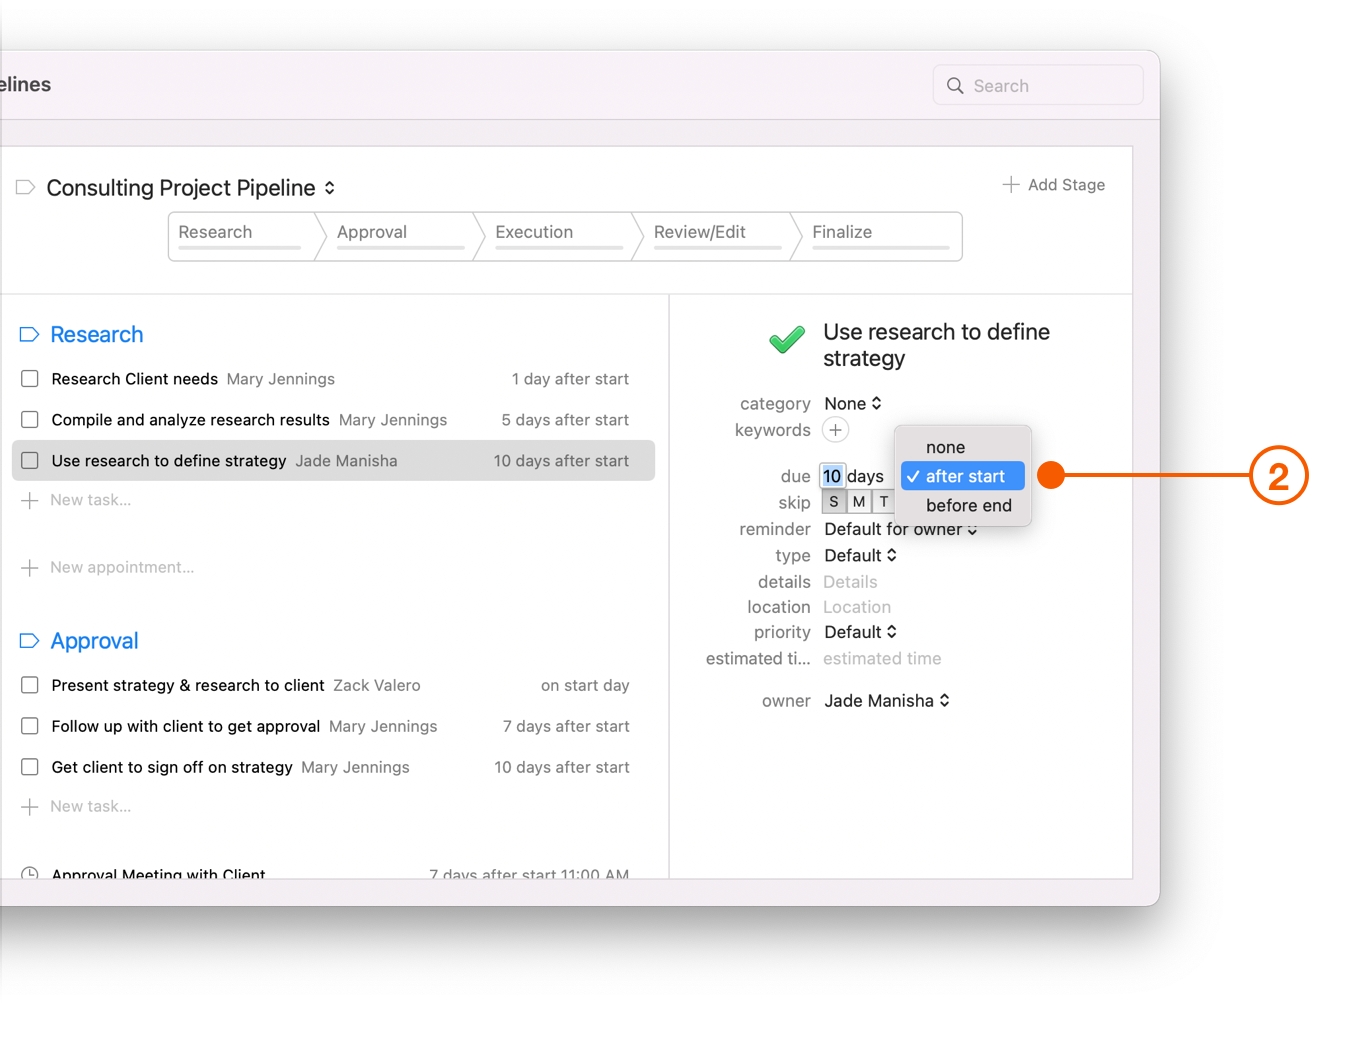
Select a Task or create a new Task, then set due to after start or before end and set the number of days. What does "after start" and "before end" mean?
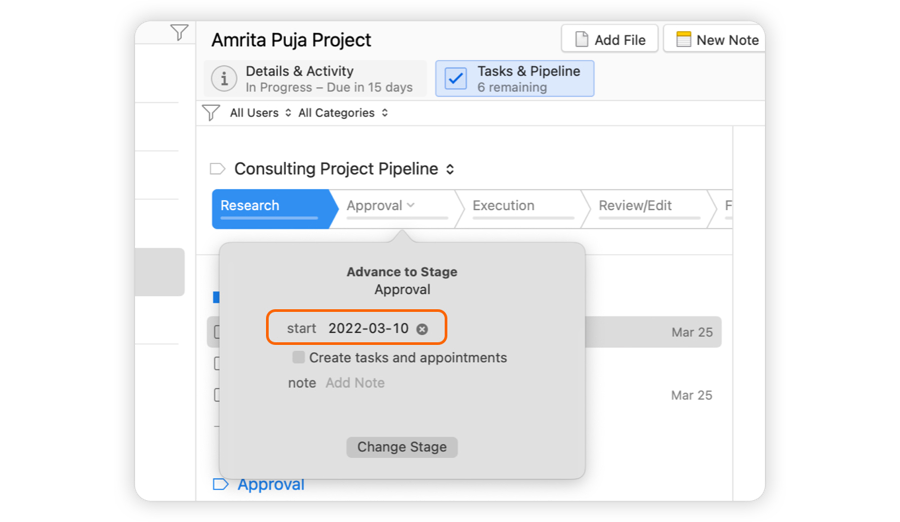
What does "after start" and "before end" mean? Whenever you add a Pipeline to a Project and then advance the Pipeline to the next Stage, you can set the "start" date of that Stage. Any Tasks with due dates "after start" will be due however many days after that day. If there are any Tasks in that Stage with due dates "before end", you will have the option to set the "end" date of that Stage.
Telling Daylite to skip certain days of the week means Tasks will never be due on your days off.
Review Your Upcoming Tasks Weekly
Setting aside time on a Monday or Friday to review Tasks for the upcoming week using your Projects with Upcoming Tasks dashboard is an excellent way to stay organized. Looking through the Projects in the list lets you know if there is anything coming up that needs your attention, and allows you to adjust due dates as needed.
One of the quickest and easiest ways to adjust your Task due dates is by using the Mini Calendar.
If your Mini Calendar isn't showing, click the Mini Calendar icon in the Daylite Sidebar.
Select your Project and click the Tasks and Pipelines tab.
Select the Tasks you want to adjust, then drag them onto the Mini-Calendar on the day you wish the Tasks to be due.
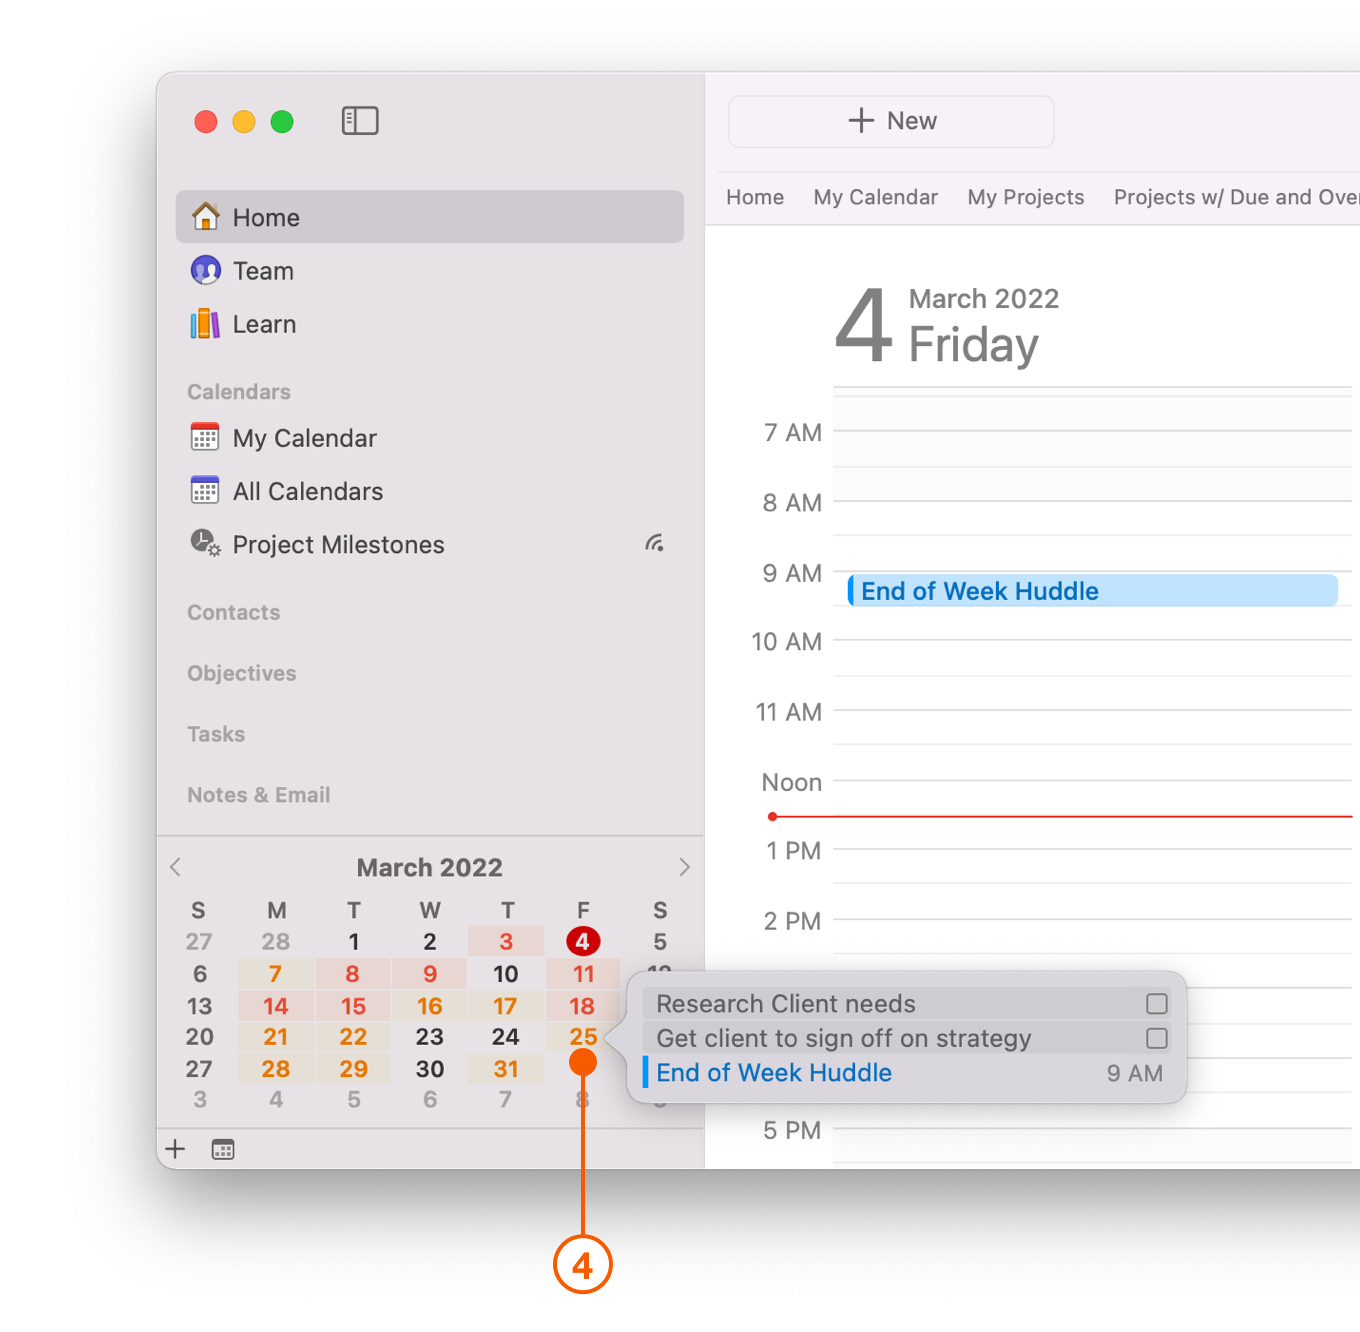
Click on any day in the Mini Calendar to review Tasks due on that day. Double-click on a day to go to it in the main Calendar.
Wrap Up
Tracking and executing the next steps of your Projects has never been so easy. No matter how many Projects you have on the go, Daylite helps you focus on the Projects and Tasks that need your attention. And by building a habit of regularly checking your upcoming Tasks you can ensure you're prepared for the week ahead and reduce the number of unexpected things that come up.
Last updated